Shopify HubSpot Integration Guide – Setup, Automation & Attribution

|
Getting your Trinity Audio player ready...
|
Integrate Shopify with HubSpot to automate cart recovery efforts, conduct full marketing attribution, and create advanced workflows with customers. Installing, configuring, automation plans, and optimization are all topics in this guide that you should follow to turn your Shopify store into an automated revenue machine.
What Is the Shopify HubSpot Integration?
The HubSpot Data Sync for Shopify is a native integration that automatically syncs customer, order, product, and cart data between platforms in real-time.
The HubSpot Data Sync for Shopify is a native connection that synchronizes customer, order, product, and cart data between sites in real-time automatically.
What Gets Synced:
Customers ⇔ Contacts (Bi-directional)
- Email, name, phone, addresses
- Customer tags, marketing preferences
- Order count, lifetime value
- Account creation date
Orders → Deals (One-way: Shopify to HubSpot)
- Order details, status, payment info
- Line items, discounts, shipping
- Customer associations
- Note: Orders are read-only in HubSpot
Products ⇔ Products (Bi-directional)
- Name, description, SKU, price
- Images, inventory, categories
- Status and vendor info
- Limitation: Variants don’t sync as separate items
Abandoned Checkouts → Carts (One-way: Shopify to HubSpot)
- Cart contents, value, timestamp
- Customer info (if provided)
- Recovery URL for follow-up
Companies ⇔ Companies (Bi-directional – B2B only)
- Company details for wholesale stores
Sync Speed:
- Initial sync: 15-60 minutes
- Ongoing sync: Every 10 minutes
- Abandoned checkouts: Real-time (1-3 minutes)
Why Integrate Shopify with HubSpot?
1. Recover 20-25% of Abandoned Checkouts
The Problem: 70% of carts are abandoned. In the case of a $100K/month store, it is a loss of 230K each month.
The Solution: Strategic timing recovery sequences that are automated and have offers.
The Result: Recovery of 20-25% with recovery rates of $10K-30K monthly.
2. Complete Marketing Attribution
Know exactly which channels, campaigns, and content drive actual sales—not just clicks.
What You Get:
- Revenue by channel (email, paid ads, organic, social)
- Multi-touch attribution across customer journey
- Campaign ROI tracking
- Customer journey visualization
Impact: Optimize marketing spend based on revenue data, typically increasing ROI by 30-50%.
3. Advanced Customer Segmentation
Go beyond basic Shopify tags with dynamic segments:
Segment Examples:
- VIP Customers: LTV > $500, 3+ orders, active last 90 days
- At-Risk High-Value: LTV > $300, no order in 90+ days
- Category Enthusiasts: Multiple category purchases.
- Discount Shoppers: Only buy with promo codes
Impact: Segmented campaigns perform 3-10x better than generic blasts.
4. Behavioral Automation
Trigger workflows based on real actions:
- First purchase → Onboarding series
- Abandoned checkout → Recovery sequence
- Inactive more than 60 days → Win-back campaign.
- Product category purchase → Specialized content
5. Unified Customer Data
Everything about the customer in a single location: buying history, emailing, browsing the site, support desk, and buying notes.
Time Saved: 10-15 hours a week per team member of manual data work.
6. Scalable Infrastructure
Use automation to achieve 10x revenue growth using 3-5x team growth.
Requirements & Preparation
Shopify Requirements:
- All Shopify plans (Basic, Shopify, Advanced, Plus)
- Access to the account for the store owner or staff.
- Launched store that is active but not protected by a password.
- De-clutter product and customer records.
HubSpot Requirements:
- Has an active HubSpot account, either free or paid.
- Permissions to access the App Marketplace or to take on the role of Super Admin
- If you need custom fields, you can purchase the Data Hub Starter for $20 per month.
Recommended Plans by Store Size:
| Monthly Revenue | Recommended Plan | Cost | Why |
| $0-$25K | HubSpot Free | $0 | Basic sync |
| $25K-$100K | Marketing Starter | $45/mo | Full automation |
| $100K-$500K | Marketing Professional | $890/mo | Advanced features |
| $500K+ | Marketing Enterprise | $3,600/mo | Full capabilities |
Pre-Installation Checklist:
Clean Shopify Data (2 hours):
- Eliminate both test clients and their orders
- Correct incorrect email addresses.
- Get customer tags standardized.
- Make sure there are no duplicate product SKUs by verifying them.
- Save out-of-date items
Prepare HubSpot (1 hour):
- Create custom properties (see the field mapping section).
- Set up the “Shopify Orders” deal pipeline.
- Create a “Shopify Orders” deal pipeline.
- Remove the test data.
Installation Guide (10 Minutes)
Method 1: Via HubSpot (Recommended)
Step 1: In HubSpot, click Marketplace icon → Search “Shopify“
Step 2: Select “Shopify (Data Sync)” by HubSpot → Click Install
Step 3: Enter your Shopify store URL: yourstore.myshopify.com
- Don’t include https:// or www
- Use your .myshopify.com URL (not custom domain)
Step 4: Log into Shopify when redirected → Review permissions → Click Install app
Step 5: Verify connection in HubSpot Settings → Integrations → Connected Apps → Shopify
Method 2: Via Shopify App Store
- In Shopify Admin, go to Apps and then the Shopify App Store.
- Type “HubSpot Data Sync” into the search bar. Add the app
- Give HubSpot permission to connect
- Check in HubSpot Connected Apps
Connecting Multiple Stores:
- In HubSpot, go to Connected Apps and then Shopify.
- Click Manage accounts under Account actions.
- Click on “Connect another account.”
- Type in the URL of the second store and give permission.
Multi-Store Best Practices:
- Make a “Shopify Store” property to find out where it came from.
- Have different deal pipelines for each store
- Make lists and workflows that are specific to each store
Troubleshooting Installation:
“Connection Failed” Error:
- Make sure Access as a Store Owner (Shopify) or Super Admin (HubSpot)
- Try using a private browsing window.
- Turn off VPN for a while.
- Try again after 10 minutes.
“Invalid Store URL” Error:
- Format must be: yourstore.myshopify.com
- No https://, no www, no custom domain
Configuration Walkthrough
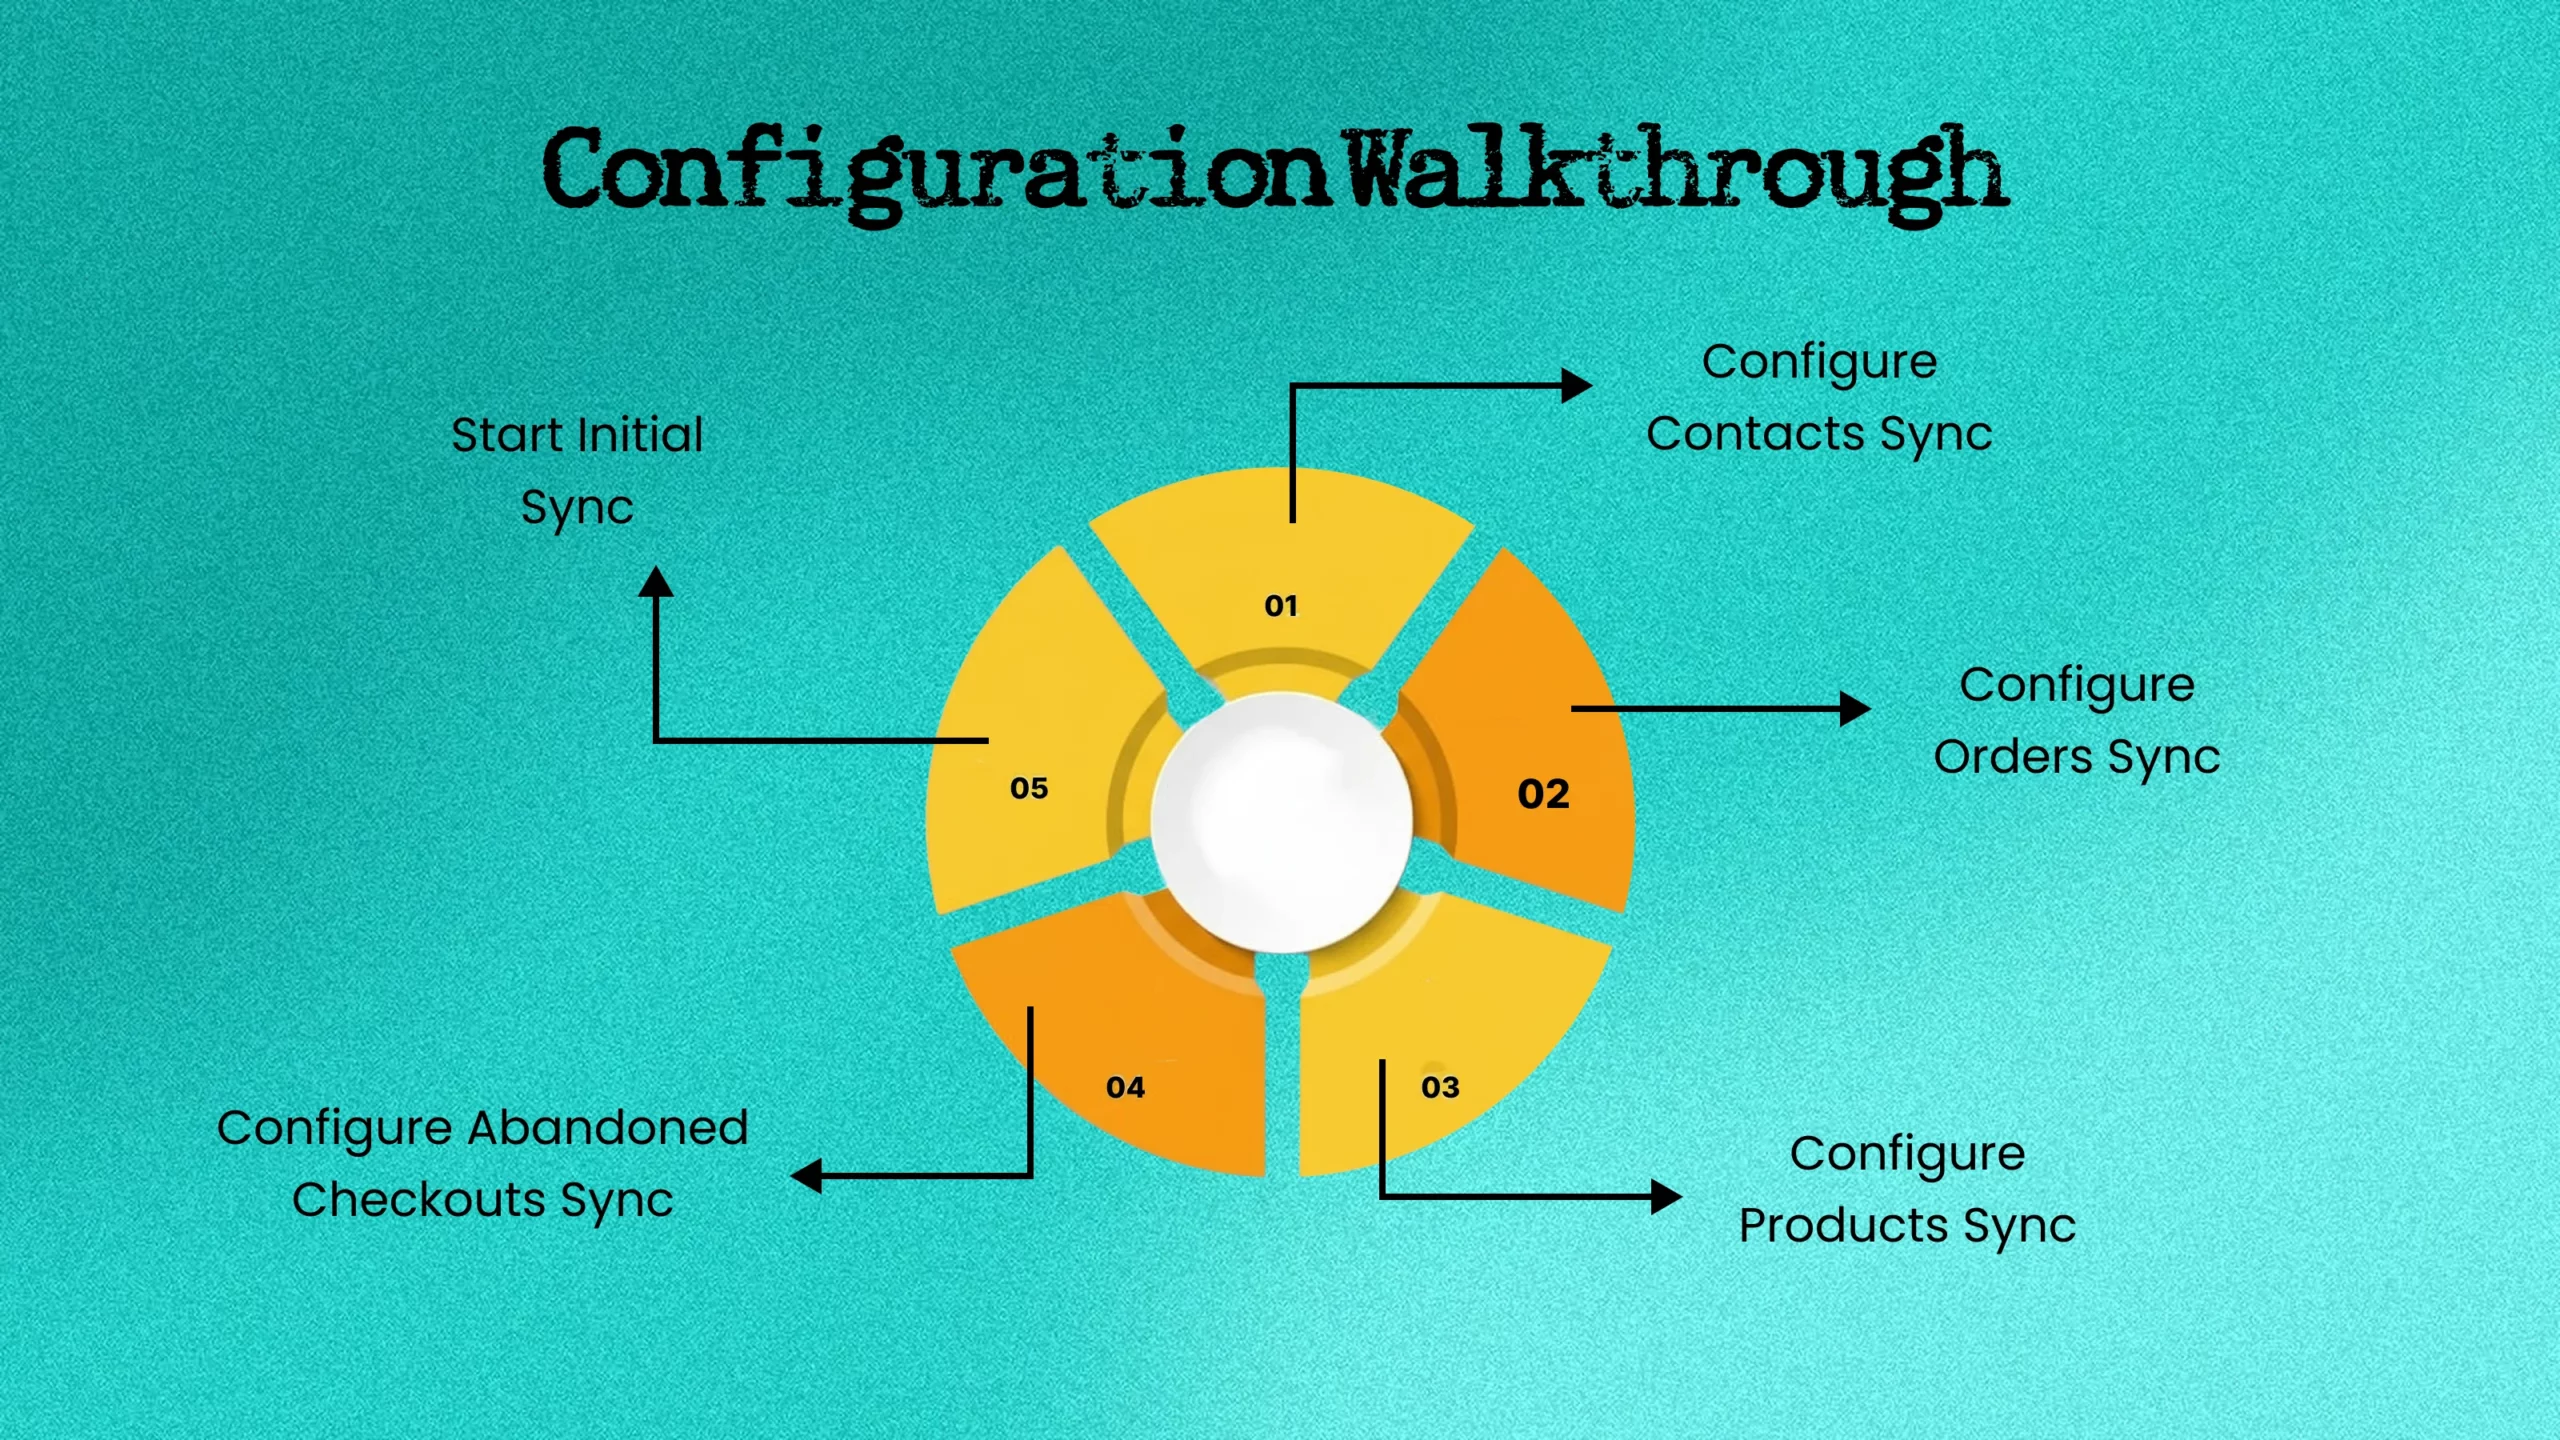
Navigate to: Settings → Integrations → Connected Apps → Shopify → CRM Syncs
1. Configure Contacts Sync
Settings:
- Sync direction: Two-way (recommended)
- Filter: ✅ Only sync customers with email address
- Optional filter: Only customers who ordered in last 180 days
Why Filter: Prevents hitting HubSpot contact limits with inactive customers.
2. Configure Orders Sync
Settings:
- Sync direction: One-way (Shopify → HubSpot)
- Deal pipeline: Shopify Orders (create if needed)
- Historical sync: Last 90 days (recommended)
Deal Stage Mapping:
- Pending → Pending Payment
- Authorized → Payment Authorized
- Paid → Paid
- Partially Fulfilled → In Fulfillment
- Fulfilled → Fulfilled
- Completed → Completed (Won)
- Refunded → Refunded (Lost)
- Cancelled → Cancelled (Lost)
3. Configure Products Sync
Settings:
- Sync direction: Two-way
- Filter: Active products only (if 1,000+ total products)
Note: Product variants don’t sync as separate items—only main product syncs.
4. Configure Abandoned Checkouts Sync
Settings:
- Sync direction: One-way (Shopify → HubSpot)
- Filter: Email is known AND Cart value > $10
Important: Shopify API changes (April 2025) removed some fields. Reconfigure custom mappings if created before April 2025.
5. Start Initial Sync
- Review all sync settings
- Click Start sync
- Monitor progress (15-60 minutes)
- Don’t close browser during initial sync
Sync Verification Checklist:
- Check contacts created in HubSpot
- Verify deals appear in pipeline
- Confirm products in library
- Test with new order
Test abandoned checkout tracking
Field Mapping Essentials
Default Contact Mapping:
| Shopify Property | HubSpot Property |
| First/Last Name | First/Last Name |
| Phone | Phone Number |
| Billing Address | Address |
| Total Spent | Lifetime Value |
| Total Orders | Total Orders |
| Customer Tags | Shopify Tags |
Custom Properties to Create:
Essential for Segmentation:
- Customer Segment (Dropdown)
- Options: New, Active, VIP, At-Risk, Dormant
- Days Since Last Order (Number)
- Calculation: Current Date – Last Order Date
- Average Order Value (Currency)
- Calculation: Lifetime Value ÷ Total Orders
- Favorite Product Category (Checkboxes)
- Your product categories
- Is Discount Shopper (Yes/No)
- Logic: Has used discount codes
- VIP Status (Yes/No)
- Logic: LTV > $500 AND Total Orders > 3
How to Create:
- Settings → Properties → Contact Properties
- Create property → Configure field type
- Map to Shopify data in sync settings
6 Revenue-Driving Workflows
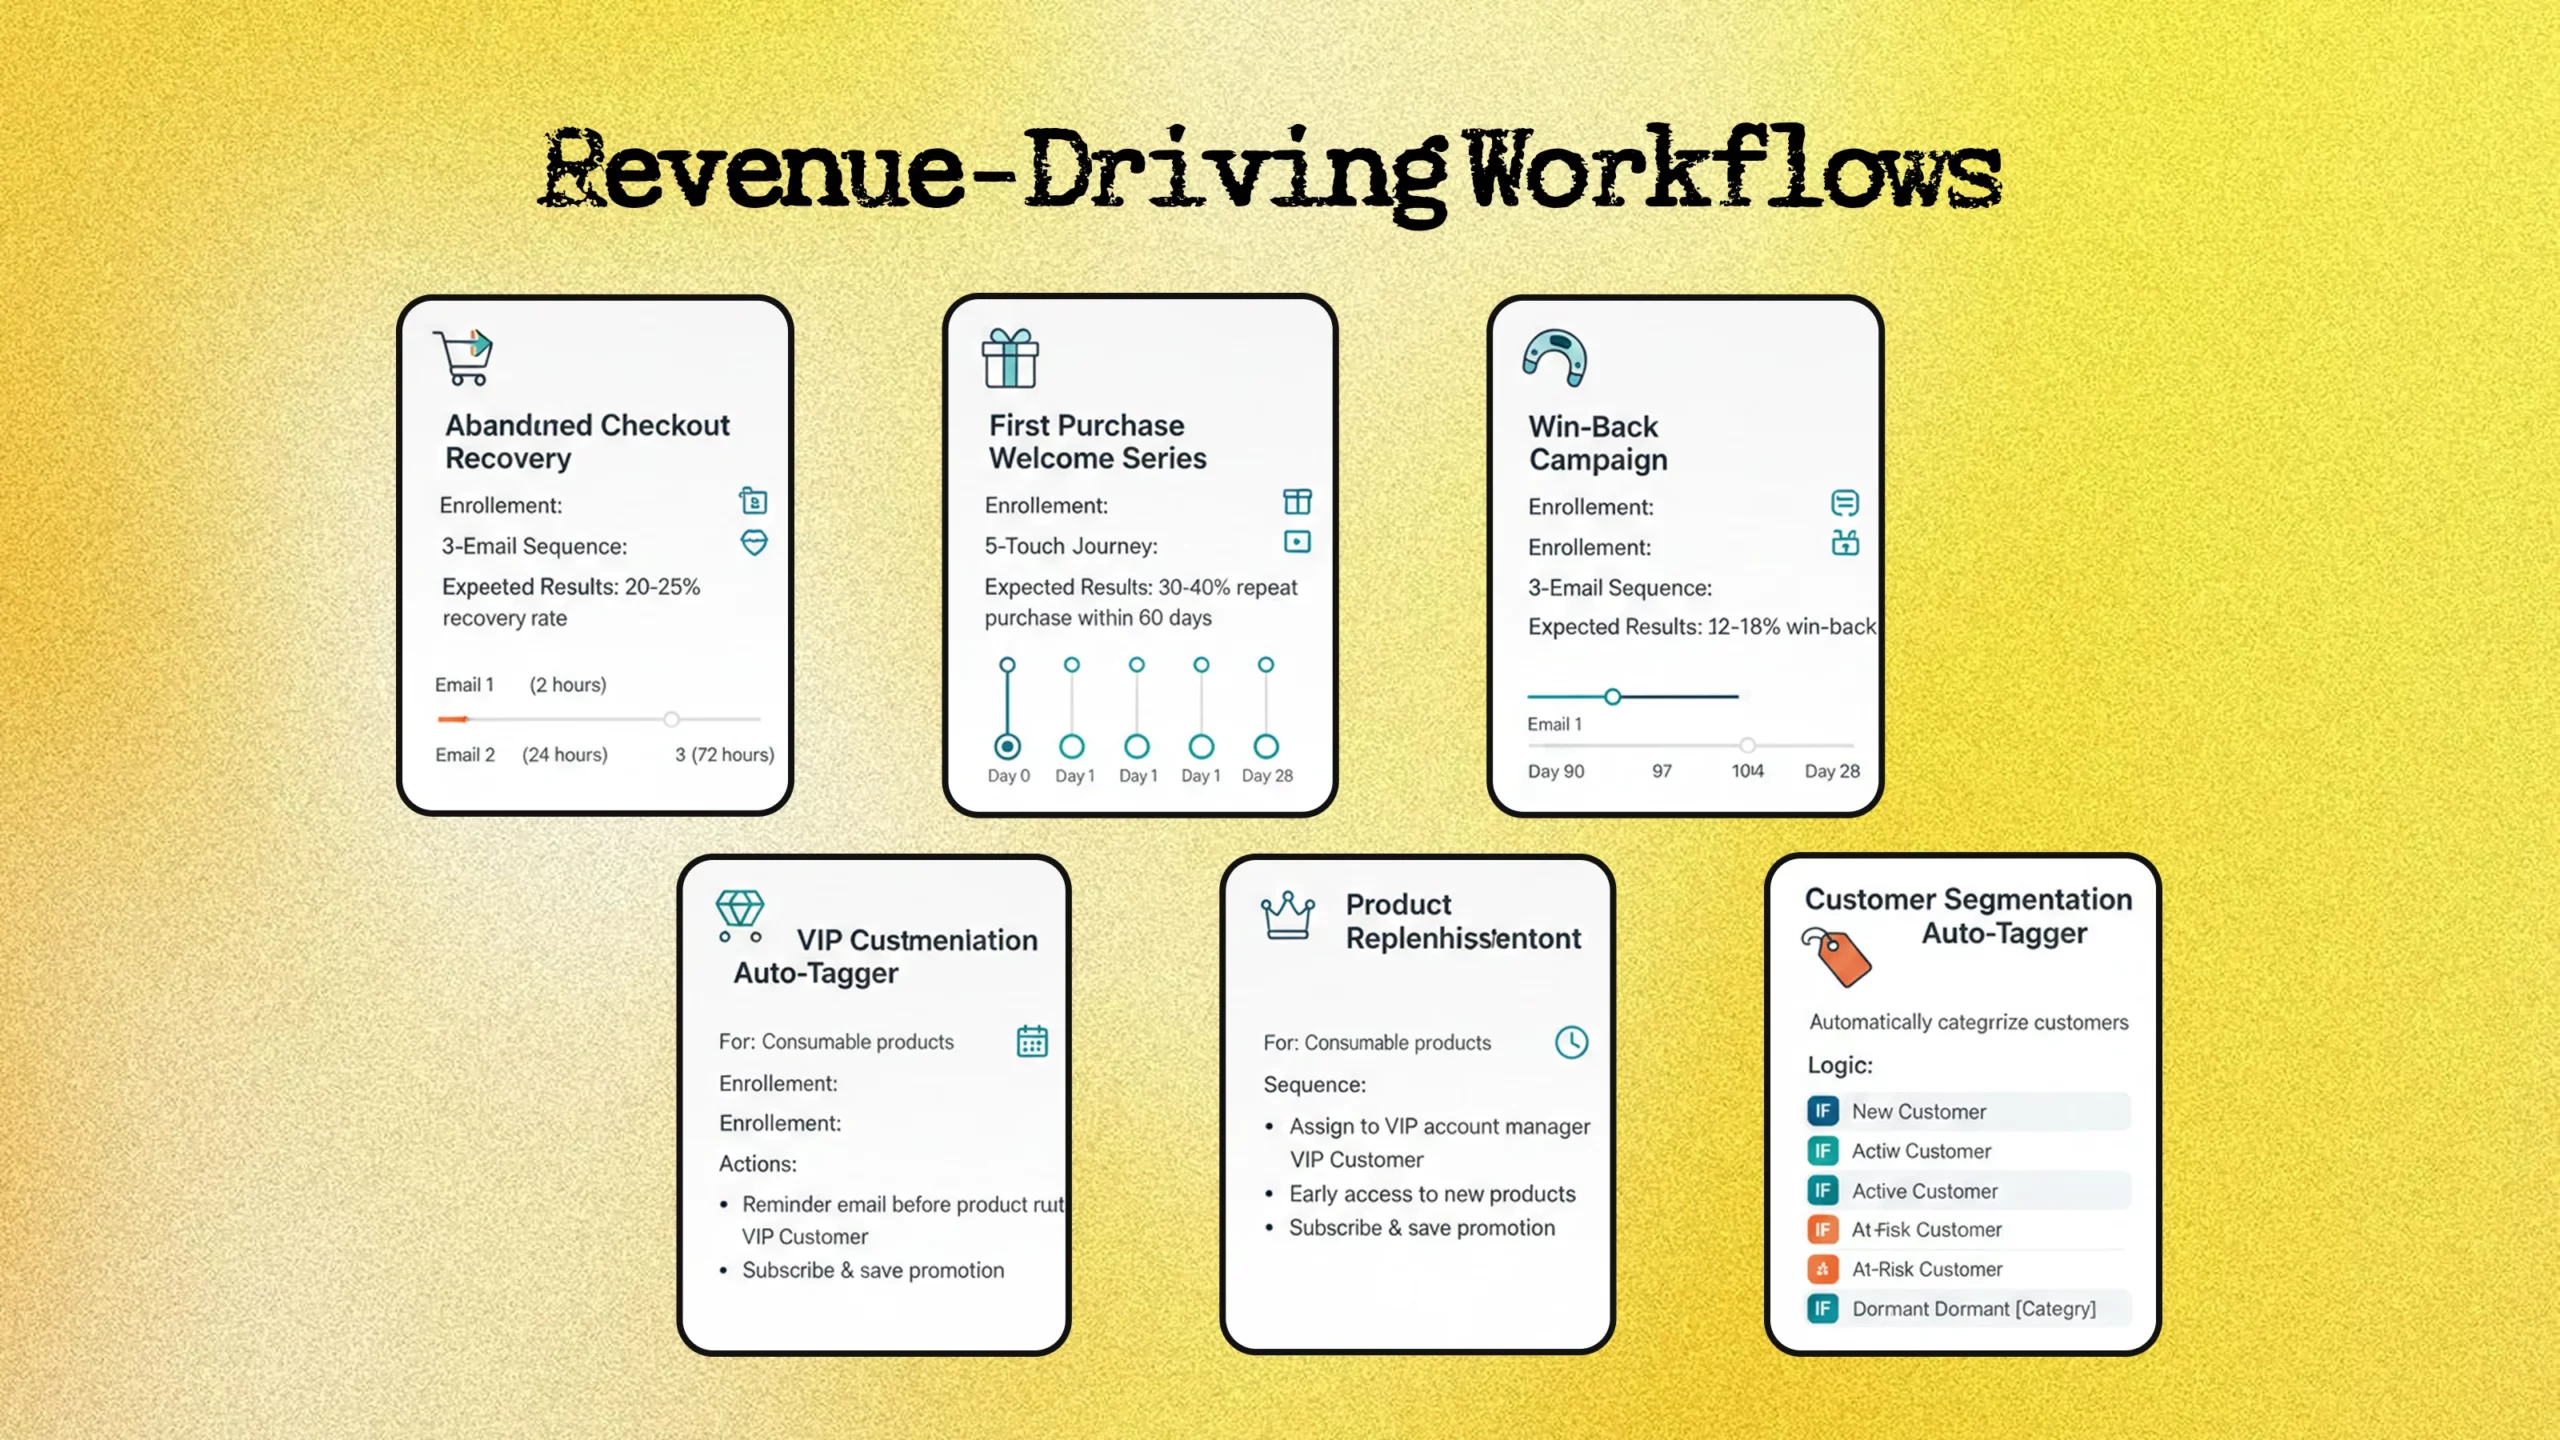
Workflow 1: Abandoned Checkout Recovery
Enrollment:
- Deal created → Stage = Abandoned Checkout
- Deal amount > $10
- Contact email is known
3-Email Sequence: Email 1 (2 hours): “You left something behind…”
- Gentle reminder with cart contents
- No discount yet
- Simple call-to-action
Email 2 (24 hours): “Here’s 15% off”
- Exclusive discount code
- Social proof (reviews)
- 48-hour expiration
Email 3 (72 hours): “Last chance”
- Final urgency
- Scarcity messaging
- Discount expires tonight
Expected Results: 20-25% recovery rate
Workflow 2: First Purchase Welcome Series
Enrollment:
- Deal stage = Completed
- Total orders = 1
5-Touch Journey:
- Day 0: Thank you + order confirmation
- Day 3: Product usage tips
- Day 7: Review request (10% off incentive)
- Day 18: Personalized product recommendations
- Day 28: VIP program invitation
Expected Results: 30-40% repeat purchase within 60 days
Workflow 3: Win-Back Campaign
Enrollment:
- Days since last order = 90
- Total orders ≥ 2
- LTV ≥ $100
3-Email Sequence:
- Day 90: “We miss you” (no offer)
- Day 97: “20% off welcome back”
- Day 104: “Last chance + feedback request”
Expected Results: 12-18% win-back rate
Workflow 4: VIP Customer Nurture
Enrollment:
- LTV > $500
- Total orders ≥ 3
- Last purchase < 90 days
Actions:
- Assign to VIP account manager
- Early access to new products
- Exclusive discounts and offers
- Personal outreach for feedback
Workflow 5: Product Replenishment
For: Consumable products (supplements, beauty, pet food)
Enrollment:
- Purchased specific product
- Days since purchase = (estimated depletion – 7 days)
Sequence:
- Reminder email before product runs out
- Reorder discount offer
- Subscribe & save promotion
Workflow 6: Customer Segmentation Auto-Tagger
Purpose: Automatically categorize customers
Logic:
- IF Total Orders = 1 AND Last Order < 30 days → Tag “New Customer”
- IF Total Orders ≥ 2 AND Last Order < 60 days → Tag “Active Customer”
- IF LTV > $500 AND Total Orders ≥ 3 → Tag “VIP Customer”
- IF LTV > $300 AND Last Order > 90 days → Tag “At-Risk Customer”
- IF Last Order > 180 days → Tag “Dormant Customer”
Dashboard & Reporting
Pre-Built eCommerce Dashboard
Access: Settings → Integrations → Shopify → Feature Discovery → Create eCommerce Dashboard
Key Reports Included:
Revenue Analytics:
- Total revenue (today/week/month/quarter/year)
- Revenue trend over time
- Revenue by product category
- Revenue forecast
Customer Metrics:
- New customers acquired
- Customer lifetime value (average)
- Repeat purchase rate
- Customer retention rate
Product Performance:
- Best sellers by revenue
- Best sellers by units
- Products with highest abandonment
- Inventory levels
Marketing Attribution:
- Revenue by channel
- Campaign ROI
- Email attribution revenue
- Customer acquisition cost
Custom Reports to Build:
- Abandoned Cart Value Tracking
- Total abandoned value monthly
- Recovery rate trend
- Revenue recovered
- Customer Cohort Analysis
- LTV by acquisition month
- Retention by cohort
- Purchase frequency trends
- Product Category Performance
- Revenue and units by category
- Category growth rates
- Cross-category purchasing
- Email Campaign Revenue
- Revenue per campaign
- ROI by campaign type
- Best-performing sequences
Troubleshooting Common Issues
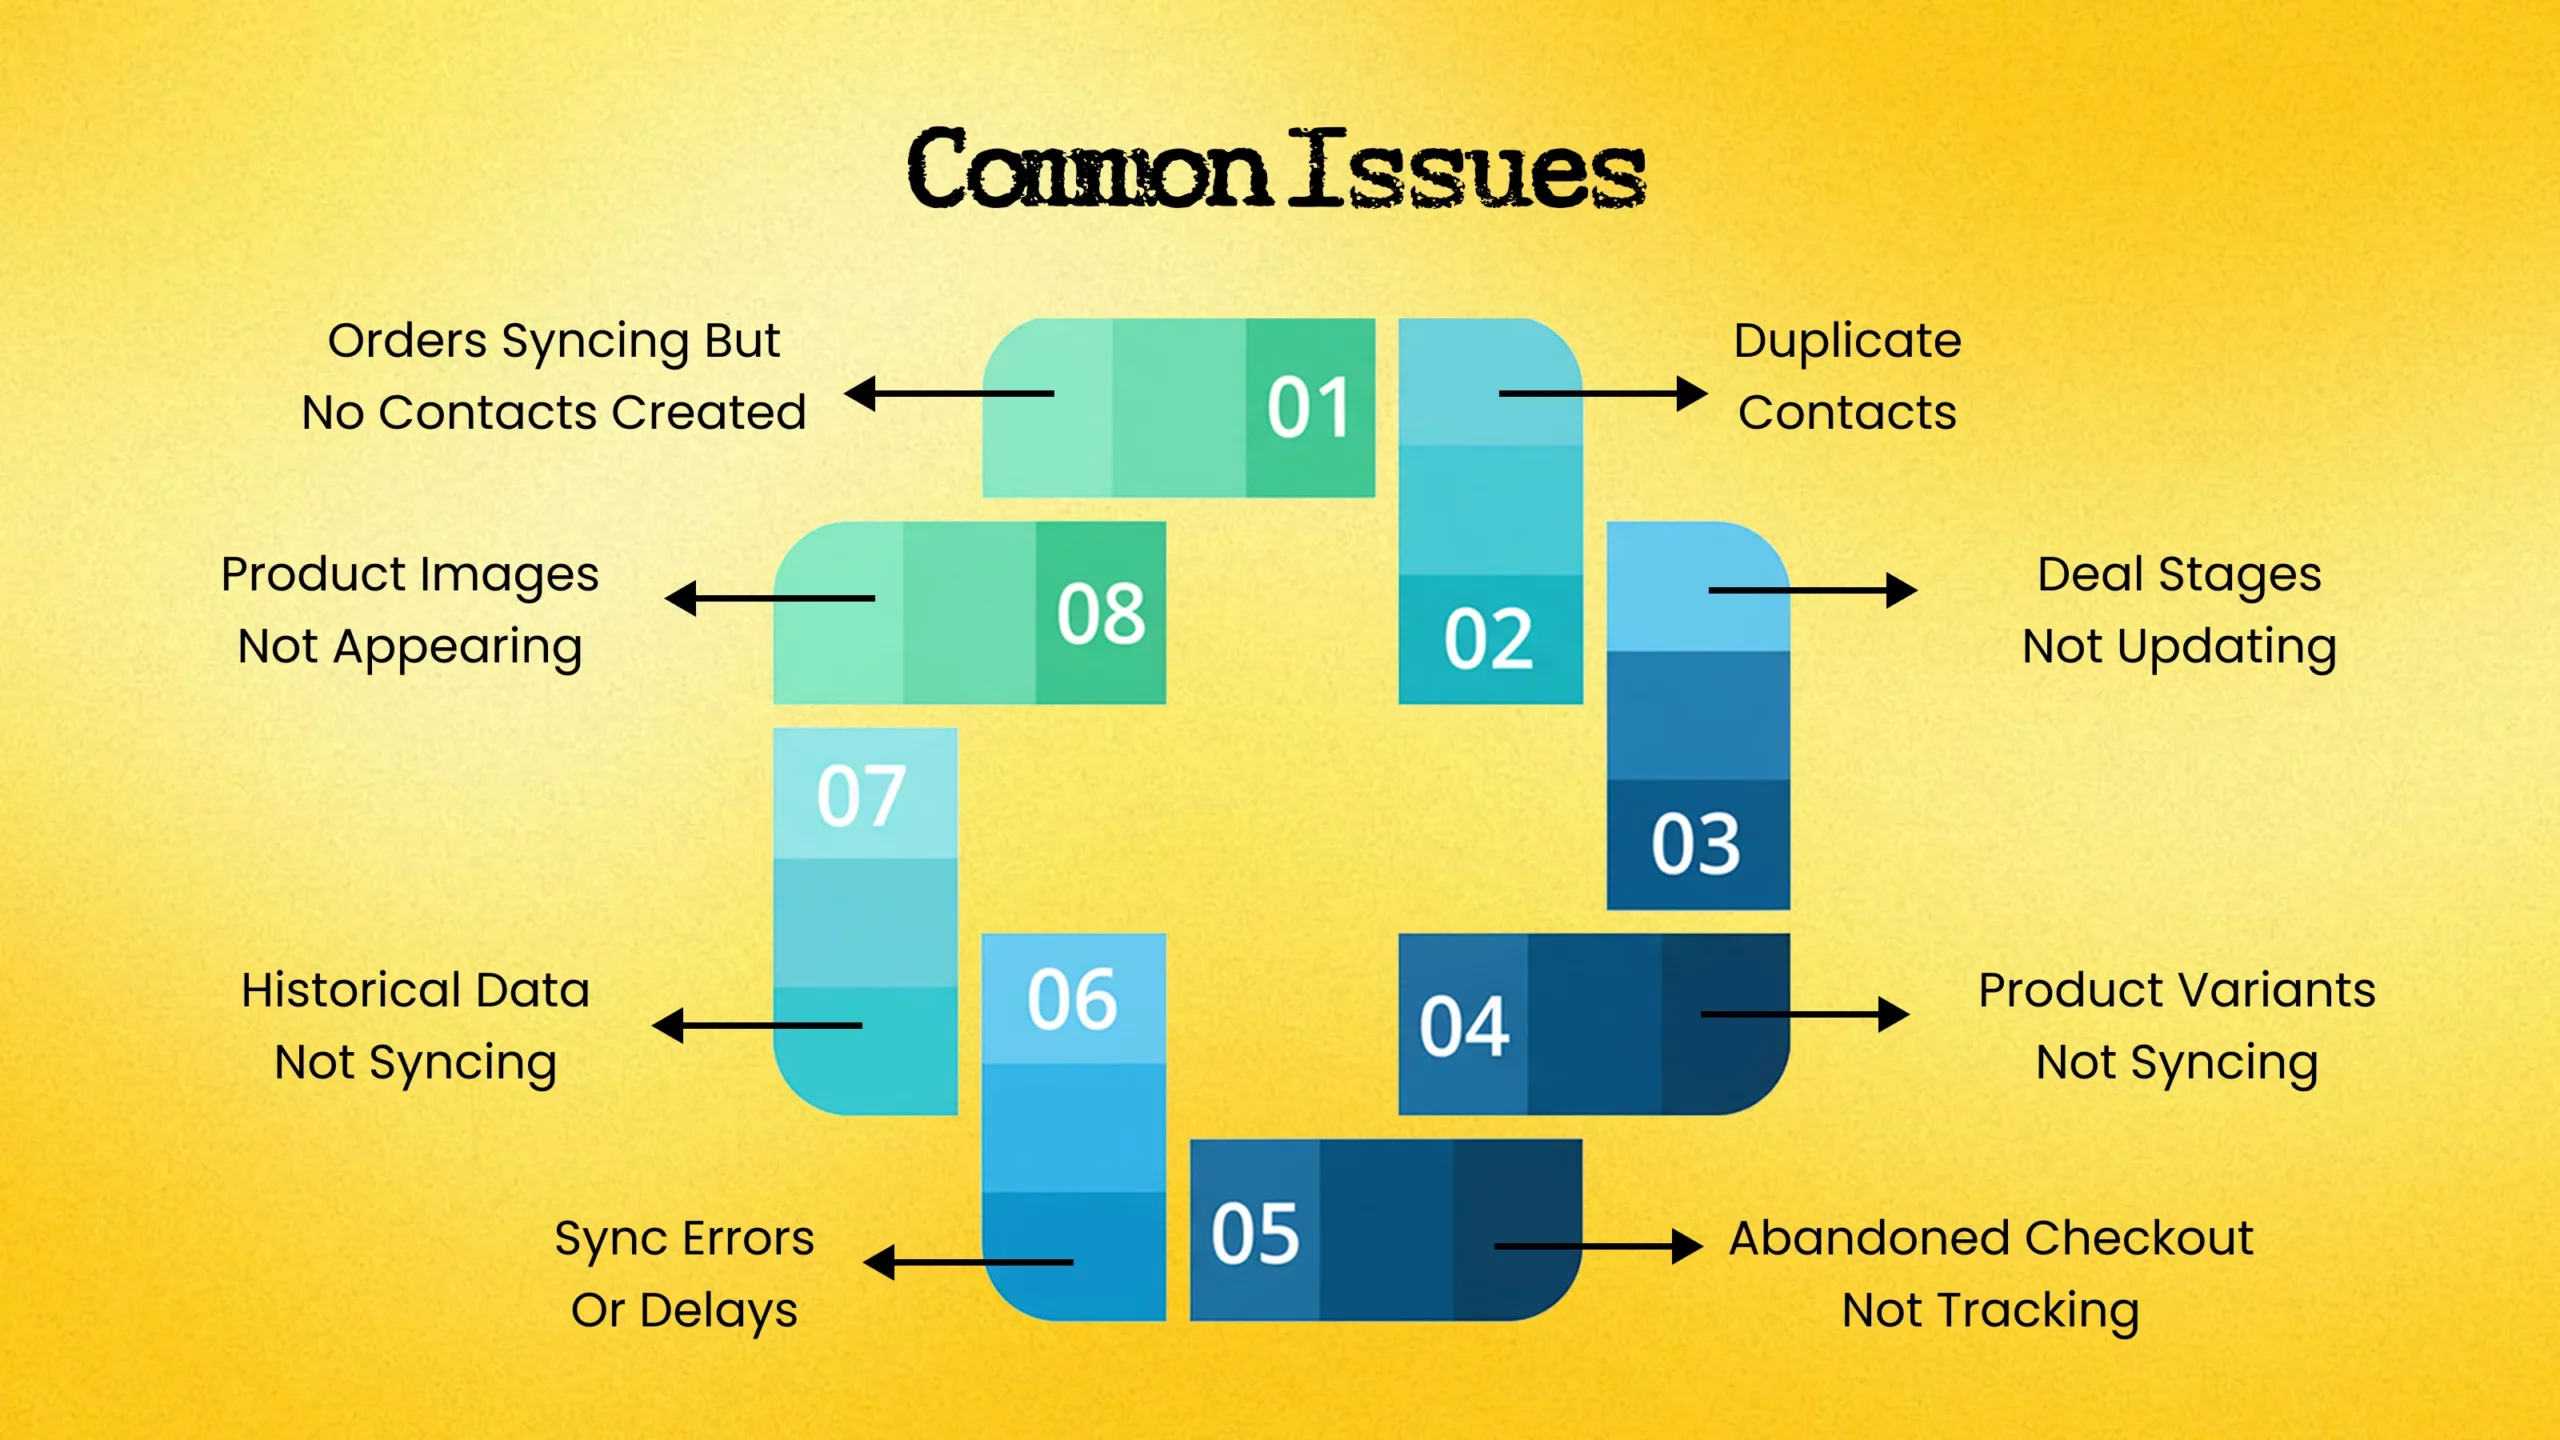
Issue 1: Orders Syncing But No Contacts Created
Cause: Email missing or invalid in Shopify order
Fix:
- Enable filter: “Only sync customers with email”
- Check Shopify orders for valid emails
- Manually create contact and associate
Issue 2: Duplicate Contacts
Cause: Customer used different emails for different orders
Fix:
- Enable automatic duplicate management in HubSpot
- Manually merge duplicates
- Set canonical email as primary
Issue 3: Deal Stages Not Updating
Cause: Manual stage changes override automation
Fix:
- Re-map order statuses to deal stages
- Check for workflows moving stages incorrectly
- Verify sync connection active
Issue 4: Product Variants Not Syncing
Limitation: Shopify API doesn’t support variant-level sync
Workaround:
- Use SKUs to differentiate in reporting
- Create separate main products for major variants
- Track variants in deal line item notes
Issue 5: Abandoned Checkout Not Tracking
Cause: Customer didn’t provide email at checkout
Fix:
- Verify abandoned cart tracking enabled
- Ensure checkout requires email early
- Test with browser cookies enabled
Issue 6: Sync Errors or Delays
Causes:
- API rate limits reached
- High order volume overwhelming sync
- Network connectivity issues
Fix:
- Check Shopify and HubSpot status pages
- Review API usage in HubSpot settings
- Upgrade plan if hitting limits consistently
- Wait and sync will resume automatically
Issue 7: Historical Data Not Syncing
Cause: Incorrect date range selected
Fix:
- Go to sync settings → Historical data
- Adjust date range (30/60/90/180/365 days)
- Manually trigger resync
Issue 8: Product Images Not Appearing
Limitation: Only primary image syncs
Workaround:
- Ensure primary image set in Shopify
- Check image URL is accessible
- Re-sync products manually
Best Practices for Long-Term Success
Weekly Maintenance (30 minutes):
- Evaluate the rate of recovering abandoned carts
- Verify if there are any sync mistakes.
- track the efficiency of the workflow
- Evaluate valuable abandoned purchases
- View the expansion of the contact list.
Monthly Optimization (2 hours):
- A/B test one workflow element
- Revise the categories of customers.
- Duplicate contact cleaning
- Review product performance
- Examine reports regarding attribution.
- Spend marketing budgets according to return on investment.
Quarterly Review (4 hours):
- carry out a health audit for integration
- Please examine all current workflows.
- Assess the sufficiency of the HubSpot plan.
- Provide training to the team regarding the new offerings.
- Make plans for advanced automation.
Data Hygiene Tips:
Contact Management:
- Put “non-marketing” next to inactive customers’ names to cut costs.
- Merge duplicates on a regular basis.
- Unsubscribe and remove hard bounces
- Provide monthly updates on client segments
Workflow Optimization:
- Track the metrics for email engagement.
- Experiment with various subject lines and times
- Edit out sequences that aren’t producing results.
- Revise holiday material
Performance Tracking:
- Achieve predetermined workflow KPIs
- Monitor progress from one month to the next
- Keep track of successful campaign elements for use in subsequent launch
- Disseminate team-wide insights
Checklist for Scaling:
When to Upgrade HubSpot Plan:
- Reaching touch limits reliably
- Require sophisticated workflow tools
- Want better attribution reporting
- Need software that facilitates teamwork
- Require customized reporting
When to Add Team Members:
- Marketing campaigns growing rapidly
- Require a specialized workflow manager
- Increasing volume of customer service
- Want specialized roles (email, ads, content)
When to Hire Expert Help:
- Complex personalized integrations required
- Advanced automation beyond your expertise
- Multiple-store configuration with unique needs
- Optimization failing to produce anticipated outcomes
Implementation Roadmap
Week 1: Setup
- Day 1–2: Get rid of extra data in Shopify and HubSpot
- Day 3: Set up the integration and connect it.
- Day 4: Set up the sync settings.
- Day 5: Check that all the data is syncing correctly.
Week 2: Basic Automation
- Day 1–2: Set up the abandoned checkout workflow
- Day 3: Make lists of different types of customers
- Day 4: Set up the eCommerce dashboard.
- Day 5: Test all of the workflows very carefully.
Week 3-4: Advanced Workflows
- Make a welcome series for first-time buyers
- Add automatic product recommendations
- Start a campaign to win back customers
- Train the team how to use the new system
Month 2: Optimize
- A/B test email sequences
- Refine customer groups
- Add workflows for VIP customers
- Look over the attribution data
- Change how much you spend on marketing
Month 3+: Scale
- Add workflows for restocking
- Make advanced segmentation
- Use predictive scoring
- Continuously optimize based on data
Next Steps
Shopify-HubSpot integration converts disjointed data into useful customer insights and automated income-generating processes. Begin with the foundations (sync and abandoned cart recovery) and proceed to testing results and then continue scaling.
Ready to implement? Use this step by step guide. Spend ten to fifteen hours during the initial two weeks to ensure appropriate setting up, and at least two or three hours every month to optimize.
Need Expert Help with Shopify–HubSpot Integration?
Need expert help? Our domain is Shopify–HubSpot integrations for growing eCommerce companies. We assist in optimizing ROI through both precise configuration and high-level automation.

Saurabh Sharma
Sr. Software Engineer


Insights that Drive Innovation
Read expert takes on custom software development, digital trends, and real-world
growth strategies — straight from the minds at TechMarcos.

Frequently Asked Questions

Does this work with HubSpot Free?
Yes, basic sync and simple workflows are compatible with HubSpot Free. Paid plans are needed to have advanced features.
Can I connect multiple Shopify stores?
Yes. Install more stores via Connected Apps → Shopify → Manage accounts. Differentiate data using different pipelines and properties.
What HubSpot plan do I actually need?
- $0-$25K/month: Free works
- $25K-$100K/month: Starter ($45/mo) recommended
- $100K+/month: Professional ($890/mo) for full features
How long does initial sync take?
Depending on the size of the data, 15-60 minutes. Do not leave the browser open when syncing.
Will this slow down my Shopify store?
No. Sync occurs through background API calls without affecting the store performance.
Can I customize field mapping?
Yes, under Data Hub Starter subscription or greater. Add user defined properties and map the fields in Shopify to them.
What happens if I disconnect?
Legacy information remains in HubSpot. New data stops syncing. The historical data will persist unless it is manually deleted.
Does this work with Shopify POS?
Yes! Online purchases are transferred to HubSpot in the same way as in-store purchases.