WooCommerce + HubSpot Integration: The Complete Setup Guide for 2026

|
Getting your Trinity Audio player ready...
|
When you have a WooCommerce Store and fail to integrate it with HubSpot, you are losing money. Every day. Every hour. With every single order.
WooCommerce currently serves more than 6.5 million online shops in the world and is the most used online store platform by WordPress users. However, the issue is as follows: the majority of owners of stores consider WooCommerce to be only a checkout service. They gather orders, deliver goods and go. In the meantime, they are sitting on a treasure trove of customer data which could be fueling automated marketing campaigns, customer recommendations and repeat buying.
The WooCommerce-HubSpot integration will turn your online store into a complex marketing engine instead of being a mere order processor. You will find out in this advanced tutorial just how to integrate WooCommerce and HubSpot, what information will be synchronised automatically, how to create powerful automation flows, and which particular strategies have brought our customers to recover 18-25% of abandoned carts and increase customer lifetime value by 40% in this overall tutorial.
Why Connect WooCommerce to HubSpot?
Before we get into the gears of how this integration works, it is important that we are clear of what this integration does to your business.
If you’re planning more integrations beyond WooCommerce, read [The Ultimate HubSpot Integrations Guide] to connect HubSpot with your full marketing stack.
The Real Business Impact
Scenario: Before Integration
One of your customers, Sarah, comes to your WooCommerce shop and sees five items, adds three of them to her cart, whose price is 247 dollars, and she leaves the checkout. You do not know that this is what has happened. Sarah receives no follow-up. She does not come back. 247 dollars lost, and you did not even know that she lived.
Two weeks after that, David buys a yoga mat from your store for $89. The purchase is done and that is all your relationship. You are not aware that David received three emails on marketing, read two fitness blog posts and typed in the search box: premium yoga blocks on your site before making the purchase. You might have made him a specific proposal of yoga blocks that include free shipping, but you do not see the path he takes.
Scenario: After Integration Sarah adds items to her cart. Within 30 minutes, HubSpot automatically mails her a reminder email with a friendly reminder note: You left something behind!, in 30 minutes time. In case she fails to reply, another email will be sent after 24 hours with a 10 percent discount code that is personalized. Three days after she finally gets a last chance message with free shipping which makes her finalize the purchase. The rate of recovery of your abandoned cart increases to 22%.
David finishes his yoga purchase. HubSpot automatically enrolls him in a post-purchase flow: confirmation of the order with a tracking number, a message with yoga tips with the invitation to start a workout, a follow-up request after two weeks, and an offer of free supplementary products (yoga blocks and straps) with references to his browsing history. David is made into a repeat customer, where his lifetime value has gone up to $89 to $347 within six months.
This is what proper integration delivers: visibility, automation, and revenue growth.
What Data Actually Syncs
Knowing specifically what data passes between WooCommerce and HubSpot can assist you in preparation of your plan of automation. Customer Contact Information:
- Name, email address, phone number
- Addresses to bill and address to ship.
- Date of creation of the customer account.
- Customer tags and customer categories.
- Custom fields you’ve configured
Order Data:
- Order ID and order date/time
- Order status (pending, processing, completed, failed, refunded)
- Order total and subtotal
- Shipping costs and tax amounts
- Payment method used
- Coupon codes applied
Product Information:
- Product names and SKUs
- Product categories and tags
- Product prices and variants
- Product images and descriptions
- Stock status and inventory levels
Behavioral Data:
- Cart abandonment events
- Product views and browsing history
- Email engagement (opens, clicks)
- Website activity and page views
- Previous purchase history
Lifecycle Stage Updates:
- Automatically moves contacts from “Lead” to “Customer” upon purchase
- Updates deal stages based on order status changes
- Tracks customer status (first-time, repeat, VIP)
Choosing Your Integration Method
The three primary solutions to integrate WooCommerce with HubSpot have varying features, prices, and complexity.
Method 1: HubSpot for WooCommerce Plugin (Official)
Best for: The majority of WooCommerce websites, particularly those only starting with HubSpot.
Cost: Free (HubSpot account required)
Key Features:
- Automatic customer contact sync
- Abandoned cart tracking
- Order data sync (deals)
- Product synchronization to HubSpot product library.
- HubSpot tracking code enlistment.
- Form integration
- List management
Limitations:
- Basic field mapping options
- Limited customization of sync rules
- May needs to pay for HubSpot plan with advanced automation.
- There are also some sophisticated eCommerce functions that are not in the Expert tier.
Setup Time: 30-60 minutes
Method 2: MakeWebBetter HubSpot Integration
Best for: Stores that require highly-customized and bi-directional sync.
Cost: $79-$199/year depending on features
Key Features:
- Advanced field mapping
- Custom property sync
- Bi-directional data flow
- Product category sync
- Order status mapping to deal stages
- Customer segmentation options
- Historical data import
- Priority support
Limitations:
- Additional cost
- Slightly more complex setup
- Requires maintenance and updates
Setup Time: 1-2 hours
Method 3: Zapier/Make Integration
Best for: Advanced users needing complete customization or connecting multiple platforms
Cost: $19.99-$49.99/month (Zapier) or $9-$29/month (Make)
Key Features:
- Complete control over data mapping
- Custom workflows and conditional logic
- Multi-platform connections
- Delayed actions and filters
- Error handling and notifications
- Unlimited customization
Limitations:
- Requires ongoing subscription
- Task limits on lower plans
- More complex to set up and maintain
- No dedicated support for WooCommerce-HubSpot specifically
Setup Time: 2-4 hours
Our Recommendation
In the case of 80% of WooCommerce stores, the official HubSpot for WooCommerce is what to start with. It is open source, in good condition, and encompasses all the necessary functionalities. You may upgrade to MakeWebBetter or custom solutions at any time in case you require more features.
Step-by-Step: Installing the HubSpot for WooCommerce Plugin

Here is the process of going through the entire setup process with the official plugin. These are steps that should be taken into consideration to prevent the typical mistakes in configuration.
Prerequisites Checklist
Before starting, ensure you have:
✅ Active WooCommerce store (WordPress 5.0+ and WooCommerce 3.0+)
✅ WordPress admin access
✅ HubSpot account (free or paid)
✅ HubSpot Super Admin permissions
✅ SSL certificate installed on your WordPress site
✅ Recent backup of your WordPress database
Step 1: Install the Plugin
Option A: Install from WordPress Dashboard (Recommended)
- Log into your WordPress admin panel
- Navigate to Plugins → Add New
- Search for “HubSpot for WooCommerce”
- Click Install Now on the official HubSpot plugin
- Click Activate once installation completes
Option B: Manual Installation
- Download the plugin from WordPress.org plugin repository
- Navigate to Plugins → Add New → Upload Plugin
- Choose the downloaded ZIP file
- Click Install Now then Activate Plugin
Step 2: Connect Your HubSpot Account
- After activation, you’ll see a “Connect to HubSpot” button in your WordPress dashboard
- Click Connect to HubSpot
- You’ll be redirected to HubSpot’s authorization page
- Log into your HubSpot account if not already logged in
- Review the permissions being requested:
- Access to contacts and contact properties
- Access to deals and products
- Ability to create and modify workflows
- Access to forms and tracking
- Click Grant Access to authorize the connection
- You’ll be redirected back to WordPress with a success message
Troubleshooting Connection Issues: If you encounter errors during connection:
- Verify you have Super Admin access in HubSpot
- Clear your browser cache and cookies
- Try using an incognito/private browser window
- Check that your WordPress site has a valid SSL certificate
- Ensure your firewall isn’t blocking HubSpot domains
Step 3: Configure Sync Settings
Now comes the critical part: configuring what data syncs and how.
Contact Sync Configuration:
- Navigate to WooCommerce → Settings → Integration → HubSpot
- Under Contact Sync, enable the following:
- ✅ Create contacts for all customers
- ✅ Create contacts for guest checkouts
- ✅ Update existing contacts with new order data
- Set your Contact Property Mapping:
- WooCommerce Email → HubSpot Email (required)
- WooCommerce First Name → HubSpot First Name
- WooCommerce Last Name → HubSpot Last Name
- WooCommerce Phone → HubSpot Phone Number
- WooCommerce Billing Country → HubSpot Country
- WooCommerce Billing State → HubSpot State/Region
Order Sync Configuration:
- Enable Sync Orders as Deals
- Configure Deal Pipeline (choose existing or create new “eCommerce Pipeline”)
- Map Order Statuses to Deal Stages:
- Pending Payment → New Deal
- Processing → In Fulfillment
- Completed → Closed Won
- Cancelled → Closed Lost
- Refunded → Closed Lost
- Failed → Closed Lost
- Set Deal Naming Convention:
- Recommended: “Order #[order_number] – [customer_name]”
- Example: “Order #1234 – John Smith”
Product Sync Configuration:
- Enable Sync Products to HubSpot
- Choose sync method:
- Sync All Products (recommended for stores with <500 products)
- Sync Selected Categories (better for large catalogs)
- Map product properties:
- Product Name → HubSpot Product Name
- Product SKU → HubSpot Product SKU
- Product Price → HubSpot Product Price
- Product Description → HubSpot Product Description
- Set Update Frequency: Real-time (recommended) or Daily
Abandoned Cart Settings:
- Enable Track Abandoned Carts
- Set Abandonment Threshold: 30 minutes (default, adjustable)
- Choose Cart Value Minimum: $0 (track all carts) or set threshold like $25
- Enable Guest Cart Tracking if you want to capture email before checkout
Step 4: Install HubSpot Tracking Code
The plugin should automatically install the HubSpot tracking code, but let’s verify:
- Navigate to HubSpot → Settings in WordPress
- Under Tracking Code, verify status shows “Installed”
- Check that Track Logged-In Users is enabled
- Visit your website in an incognito window
- View page source (Ctrl+U) and search for “hs-analytics”
- If found, tracking is working correctly
Manual Verification:
- Log into HubSpot
- Navigate to Reports → Analytics Tools → Traffic Analytics
- Wait 5-10 minutes after visiting your site
- Check if your test visit appears in recent traffic
Step 5: Create Custom Properties (Optional but Recommended)
Custom properties help you segment and personalize better:
- In HubSpot, go to Settings → Properties → Contact Properties
- Click Create Property
- Create these useful custom properties:
First Purchase Date
- Type: Date Picker
- Description: Date of customer’s first order
- Used for: Calculating customer tenure
Total Orders Count
- Type: Number
- Description: Total number of completed orders
- Used for: Identifying repeat customers
Total Revenue
- Type: Number (Currency)
- Description: Lifetime customer value
- Used for: Segmenting VIP customers
Product Categories Purchased
- Type: Multiple Checkboxes
- Options: Your WooCommerce product categories
- Used for: Product recommendation targeting
Last Product Purchased
- Type: Single-line Text
- Description: Most recent product name
- Used for: Personalization and follow-ups
Average Order Value
- Type: Number (Currency)
- Description: Average spend per order
- Used for: Customer segmentation
Step 6: Historical Data Import
If you have existing WooCommerce customers and orders:
- Navigate to WooCommerce → Settings → Integration → HubSpot
- Find Import Historical Data section
- Choose import scope:
- Last 30 days (quick test)
- Last 90 days (recommended)
- Last 12 months (comprehensive)
- All time (for complete history)
- Click Start Import
- Monitor progress in the Import Status section
- Expect 500-1000 records per hour (varies by server)
Important: Large imports (10,000+ records) should be done during off-peak hours to avoid performance issues.
Building Powerful Automation Workflows
Now that data is flowing between WooCommerce and HubSpot, let’s build automation workflows that drive revenue.
Workflow 1: Abandoned Cart Recovery Series
This workflow alone can recover 15-25% of abandoned carts. Setup Steps:
- In HubSpot, navigate to Automation → Workflows
- Click Create Workflow → From Scratch
- Choose Contact-based workflow
- Name it: “WooCommerce Abandoned Cart Recovery”
Enrollment Triggers:
- Contact Property: “Recent Cart Abandonment” = “True”
- AND Cart Total > $25 (adjust to your threshold)
- Re-enrollment: Do not re-enroll contacts who meet criteria
Workflow Actions: Delay: 30 minutes (give them time to come back naturally) If/Then Branch: Has Order Been Completed?
- Contact Property: Deal Stage = “Completed”
- If Yes: End workflow
- If No: Continue
Send Email 1: Friendly Reminder
Hi [First Name],

We really want you to love [Product Name]!
Here's an exclusive 10% discount just for you.

**Use code:** WELCOME10 at checkout

[Cart Contents]

**Original Total:** $[Cart Total]
**Your Price:** $[Discounted Total]

[Claim My Discount Button]

This offer expires in 48 hours!
Delay: 24 hours
If/Then Branch: Check Order Status Again
- If Purchased: End workflow
- If Not: Continue
Send Email 2: Incentive Offer
"Hi [First Name],

We really want you to love [Product Name]!
Here's an exclusive 10% discount just for you.

**Use code:** WELCOME10 at checkout

[Cart Contents]

**Original Total:** $[Cart Total]
**Your Price:** $[Discounted Total]

[Claim My Discount Button]

This offer expires in 48 hours!"
Delay: 3 days
If/Then Branch: Final Check
- If Purchased: End workflow
- If Not: Send final email
Send Email 3: Last Chance
Subject: "Last chance: Your cart expires tonight 🚨" Content:
Hi [First Name],

This is your final reminder! Your saved cart and special discount expire at midnight tonight.

[Cart Contents]
Final Price: $[Discounted Total] (10% off!)

[Complete My Order Now]

After tonight, this deal is gone forever.

Questions? We're here to help!
End Workflow
Advanced Tip: Add a delay of 7 days after the last email, then send a “customer survey” email asking why they didn’t purchase. This feedback helps you improve your store and offerings.
Workflow 2: Post-Purchase Thank You & Review Request
Turn first-time buyers into loyal advocates. Enrollment Triggers:
- Deal Stage = “Completed”
- AND Number of Orders = 1 (first-time customers only)
Workflow Actions:
Immediate: Send Thank You Email Subject: “Thank you for your order! 🎉” Content includes: Order summary, tracking info, customer support contact
Delay: 3 days (product should have arrived)
Send Email: Getting Started Guide Subject: “Getting the most from your [Product Name]” Content: Tips, tutorials, care instructions specific to what they purchased
Delay: 7 days If/Then Branch: Has Left Review?
- Contact Property: “Product Review Status” ≠ “Completed”
- If No Review: Continue
- If Review Exists: Skip to product recommendations
Send Email: Review Request
Subject: "How's [Product Name] working out? 🌟" Content:
Hi [First Name],

It's been a week since your [Product Name] arrived. We'd love to hear what you think!

Your honest review helps other customers make confident decisions (and helps us improve!).

[Leave a Review Button]

Take less than 60 seconds, and you'll make our day!

Thanks,
[Your Store Name]
Delay: 14 days
Send Email: Product Recommendations Subject: “You might also love these…” Content: 3-5 complementary products based on purchase history
Workflow 3: VIP Customer Nurture
Reward and retain your best customers. Enrollment Triggers:
- Total Orders Count ≥ 3
- OR Total Revenue ≥ $500
- Re-enrollment: Never (one-time VIP welcome)
Workflow Actions:
Set Contact Property: Customer Segment = “VIP”
Send Email: VIP Welcome

Subject: "Welcome to our VIP Club! 🌟"

Content:
Hi [First Name],
You've officially become one of our VIP customers! Here's what that means:

- Early access to new products
- Exclusive VIP-only discounts
- Free shipping on all orders
- Priority customer support
- Birthday surprise (coming soon!)

To celebrate, here's a special thank you:

[20% Off Your Next Order]
Code: VIP20

Thank you for being amazing!
Set up List Enrollment: Add to “VIP Customers” list for ongoing campaigns
Create Task: Assign to customer success team: “Personal check-in with VIP customer”
Workflow 4: Win-Back Inactive Customers
Re-engage customers who haven’t purchased recently. Enrollment Triggers:
- Days Since Last Purchase ≥ 90
- AND Total Orders ≥ 1
- AND Last Email Open Date < 30 days ago (shows some engagement)
Workflow Actions:
Send Email 1: “We Miss You!” Subject: “It’s been a while, [First Name] 👋” Content: Personalized message referencing their last purchase, “come back” offer
Delay: 7 days
If/Then Branch: Made Purchase?
- If Yes: End workflow
- If No: Continue
Send Email 2: Customer Feedback Survey Subject: “Can you help us improve?” Content: Short survey asking why they stopped shopping, what would bring them back
Delay: 7 days
Send Email 3: Last Attempt Subject: “One more thing before you go…” Content: Best offer you can afford (25% off, free shipping, etc.)
Advanced Segmentation Strategies
Proper segmentation is the difference between “spray and pray” marketing and surgical precision targeting.
Segment 1: High-Intent Browsers
Criteria:
- Has NOT made a purchase
- Viewed 5+ products in last 7 days
- Visited checkout page but didn’t complete
- Email opened at least once
Use Case: Send targeted product recommendations with first-purchase discount
Expected Conversion: 8-12%
Segment 2: One-Time Buyers
Criteria:
- Total Orders = 1
- Days since purchase: 30-90
- Has NOT been in any recent workflows
Use Case: Win-back campaign with personalized recommendations based on first purchase
Expected Conversion: 15-20%
Segment 3: Repeat Customers
Criteria:
- Total Orders ≥ 2
- Average Days Between Purchases ≤ 60
- Last Purchase < 45 days ago
Use Case: Subscription offer, loyalty program invitation, refer-a-friend incentive
Expected Value: 35% higher LTV than one-time buyers
Segment 4: At-Risk VIPs
Criteria:
- Total Revenue ≥ $500
- Days Since Last Purchase ≥ 120
- Previous Purchase Frequency: Every 30-60 days
Use Case: Personal outreach from founder/owner, exclusive VIP recovery offer, phone call
Expected Recovery Rate: 25-35%
Segment 5: Category Enthusiasts
Criteria:
- 75%+ of purchases from single product category
- Total Orders ≥ 2
- High email engagement (>40% open rate)
Use Case: New product launches in their favorite category, expert content, beta testing opportunities
Expected Engagement: 2-3x higher than general campaigns
Optimizing Your Integration for Maximum ROI
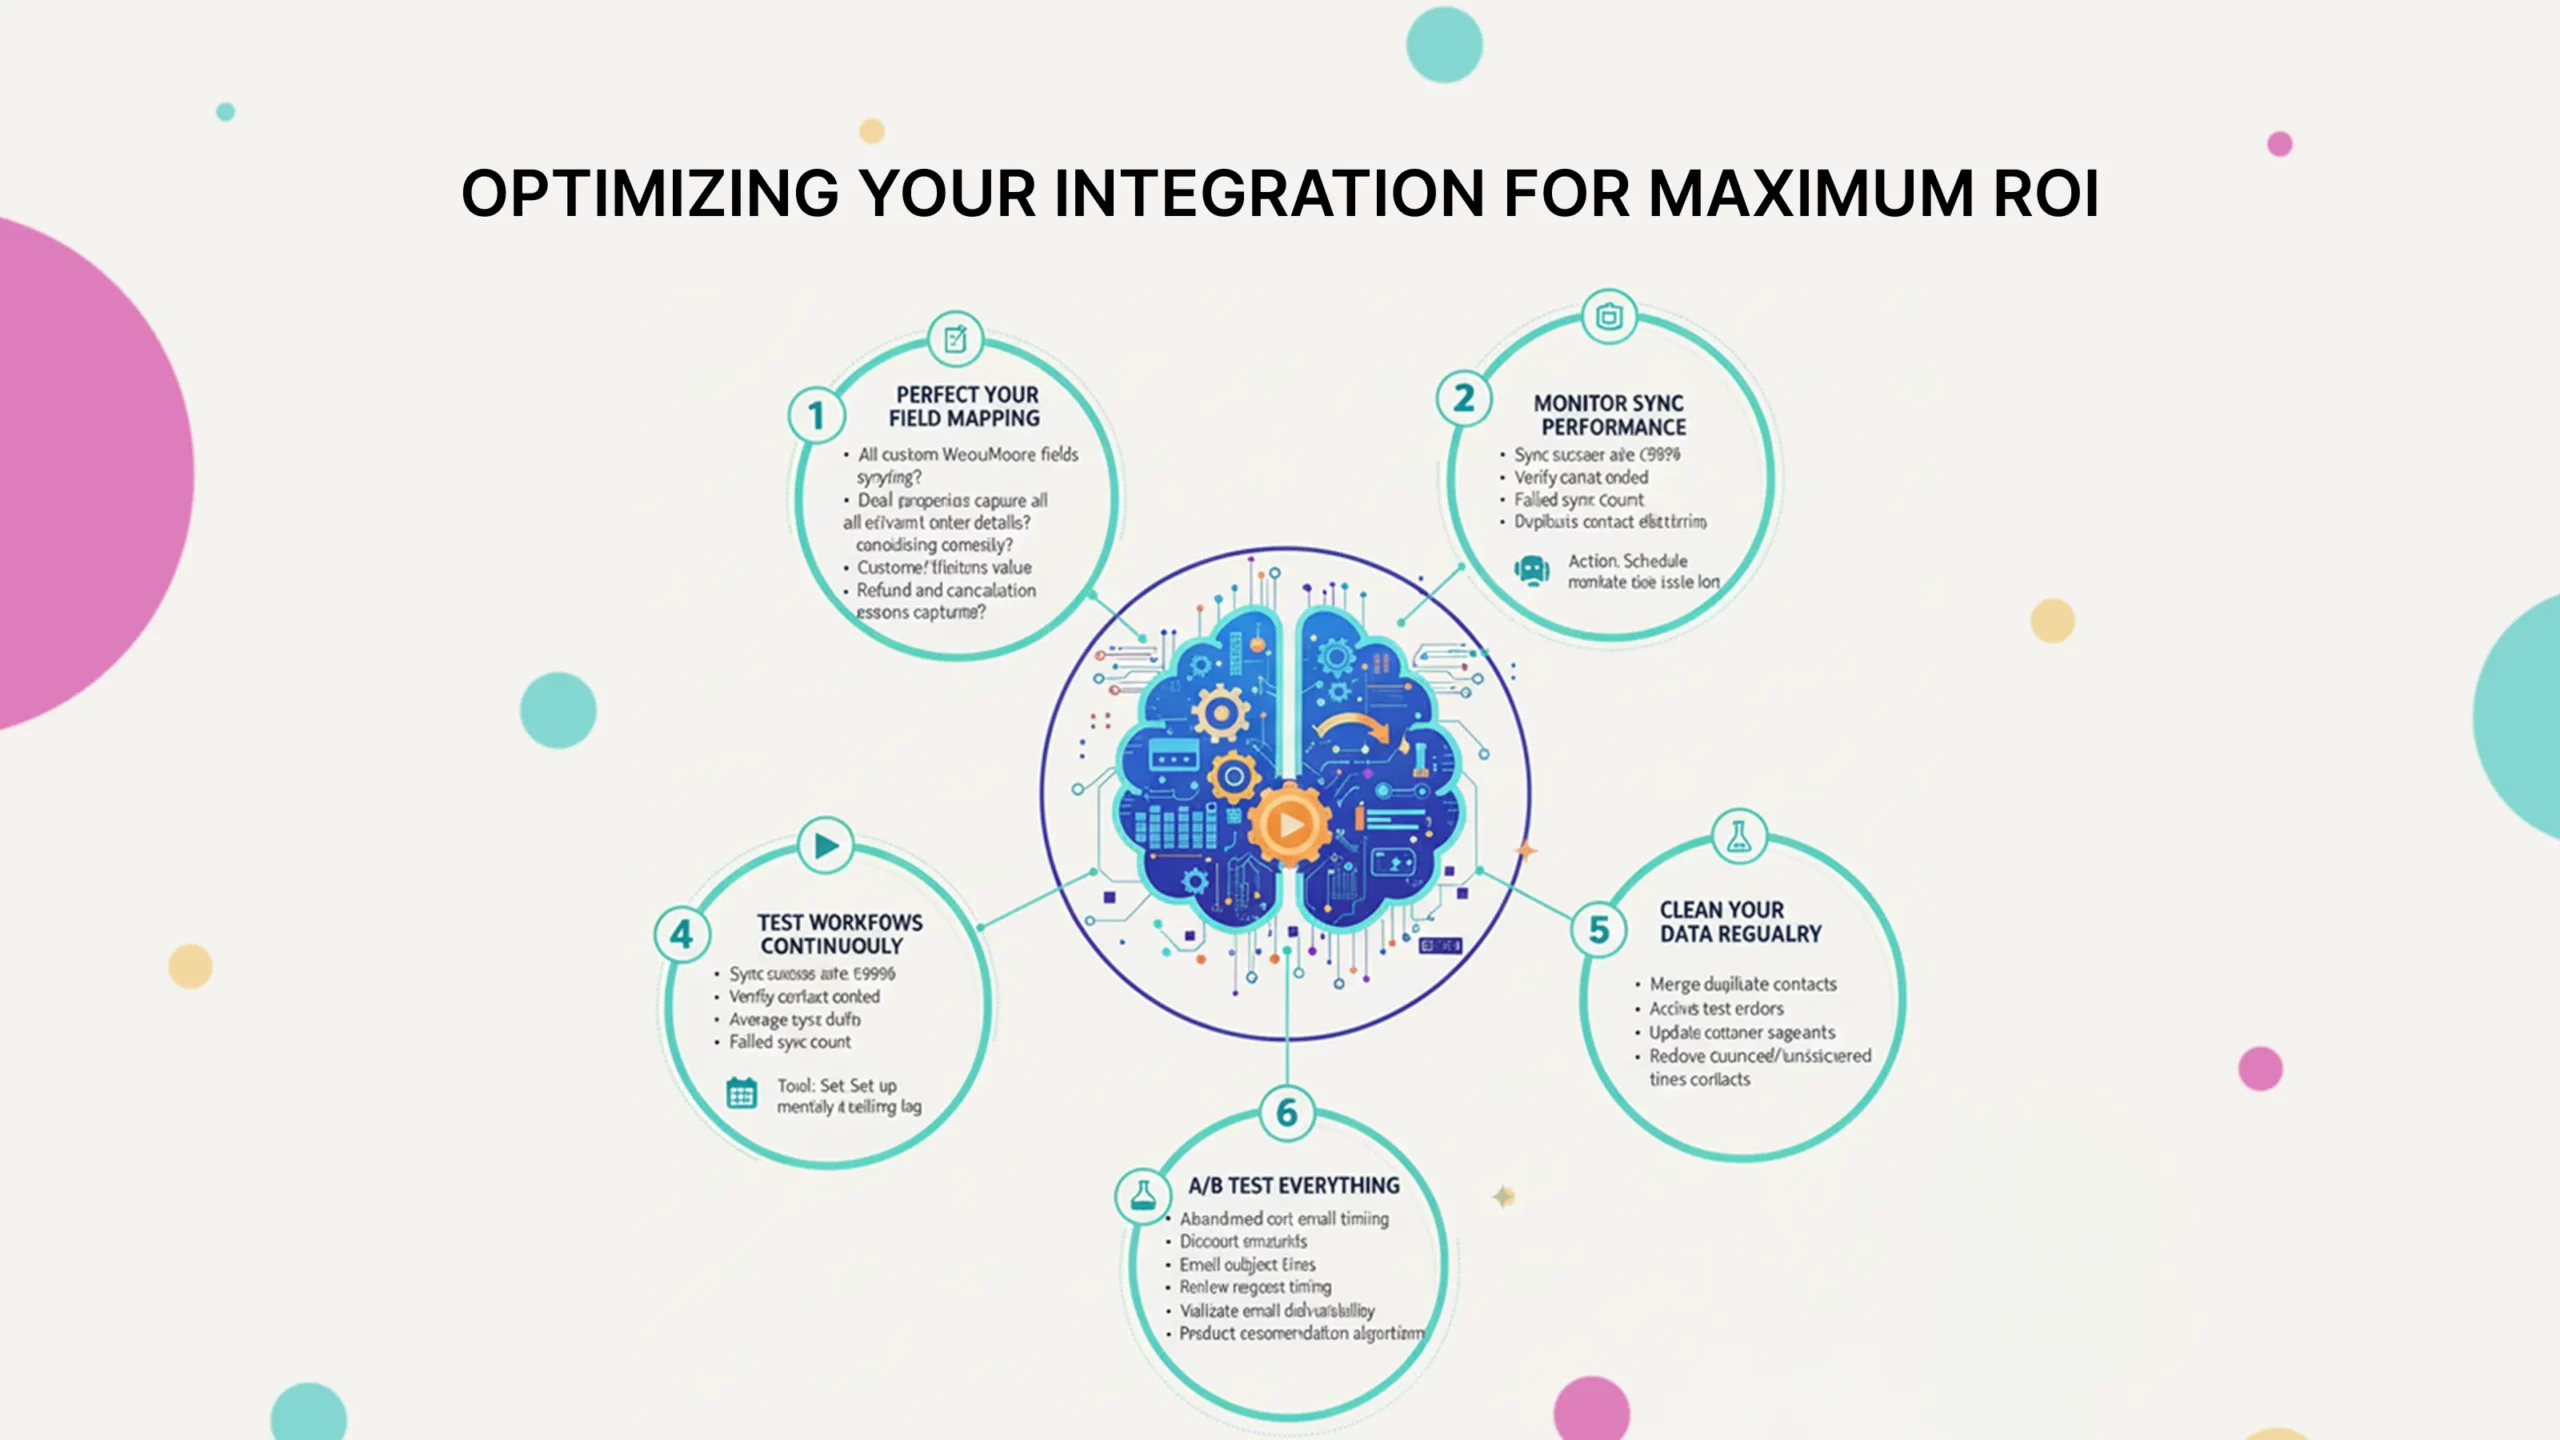
Getting the integration running is step one. Optimizing it for peak performance is where the real money comes from.
1. Perfect Your Field Mapping
Default field mapping often misses crucial data points. Audit your mapping quarterly:
Review Checklist:
- Are all custom WooCommerce fields syncing?
- Do deal properties capture all relevant order details?
- Are product categories mapping correctly?
- Is customer lifetime value calculating accurately?
- Are refund and cancellation reasons captured?
Action: Schedule monthly data audit to catch mapping issues early
2. Monitor Sync Performance
Key Metrics to Track:
- Sync success rate (should be >98%)
- Average sync delay (should be <5 minutes for real-time)
- Failed sync count (investigate any failures immediately)
- Duplicate contact creation rate (should be <1%)
Tool: Set up HubSpot workflow to alert you when sync fails
3. Test Workflows Continuously
Monthly Testing Protocol:
- Create test order as guest checkout
- Verify contact created correctly in HubSpot
- Check deal creation and proper stage assignment
- Confirm abandoned cart workflow triggers
- Test product sync accuracy
- Validate email deliverability
Documentation: Keep testing log to identify patterns in failures
4. A/B Test Everything
Test Variables:
- Abandoned cart email timing (30 min vs 1 hour vs 2 hours)
- Discount amounts (10% vs 15% vs free shipping)
- Email subject lines
- Review request timing (3 days vs 7 days vs 14 days)
- Product recommendation algorithms
Methodology: Test one variable at a time with minimum 500 contacts per variant
5. Clean Your Data Regularly
Monthly Cleanup Tasks:
- Merge duplicate contacts
- Archive test orders and contacts
- Update customer segments
- Validate email deliverability
- Remove bounced/unsubscribed contacts from active workflows
Tool: Use HubSpot’s duplicate management tool + workflow automation
Troubleshooting Common Issues
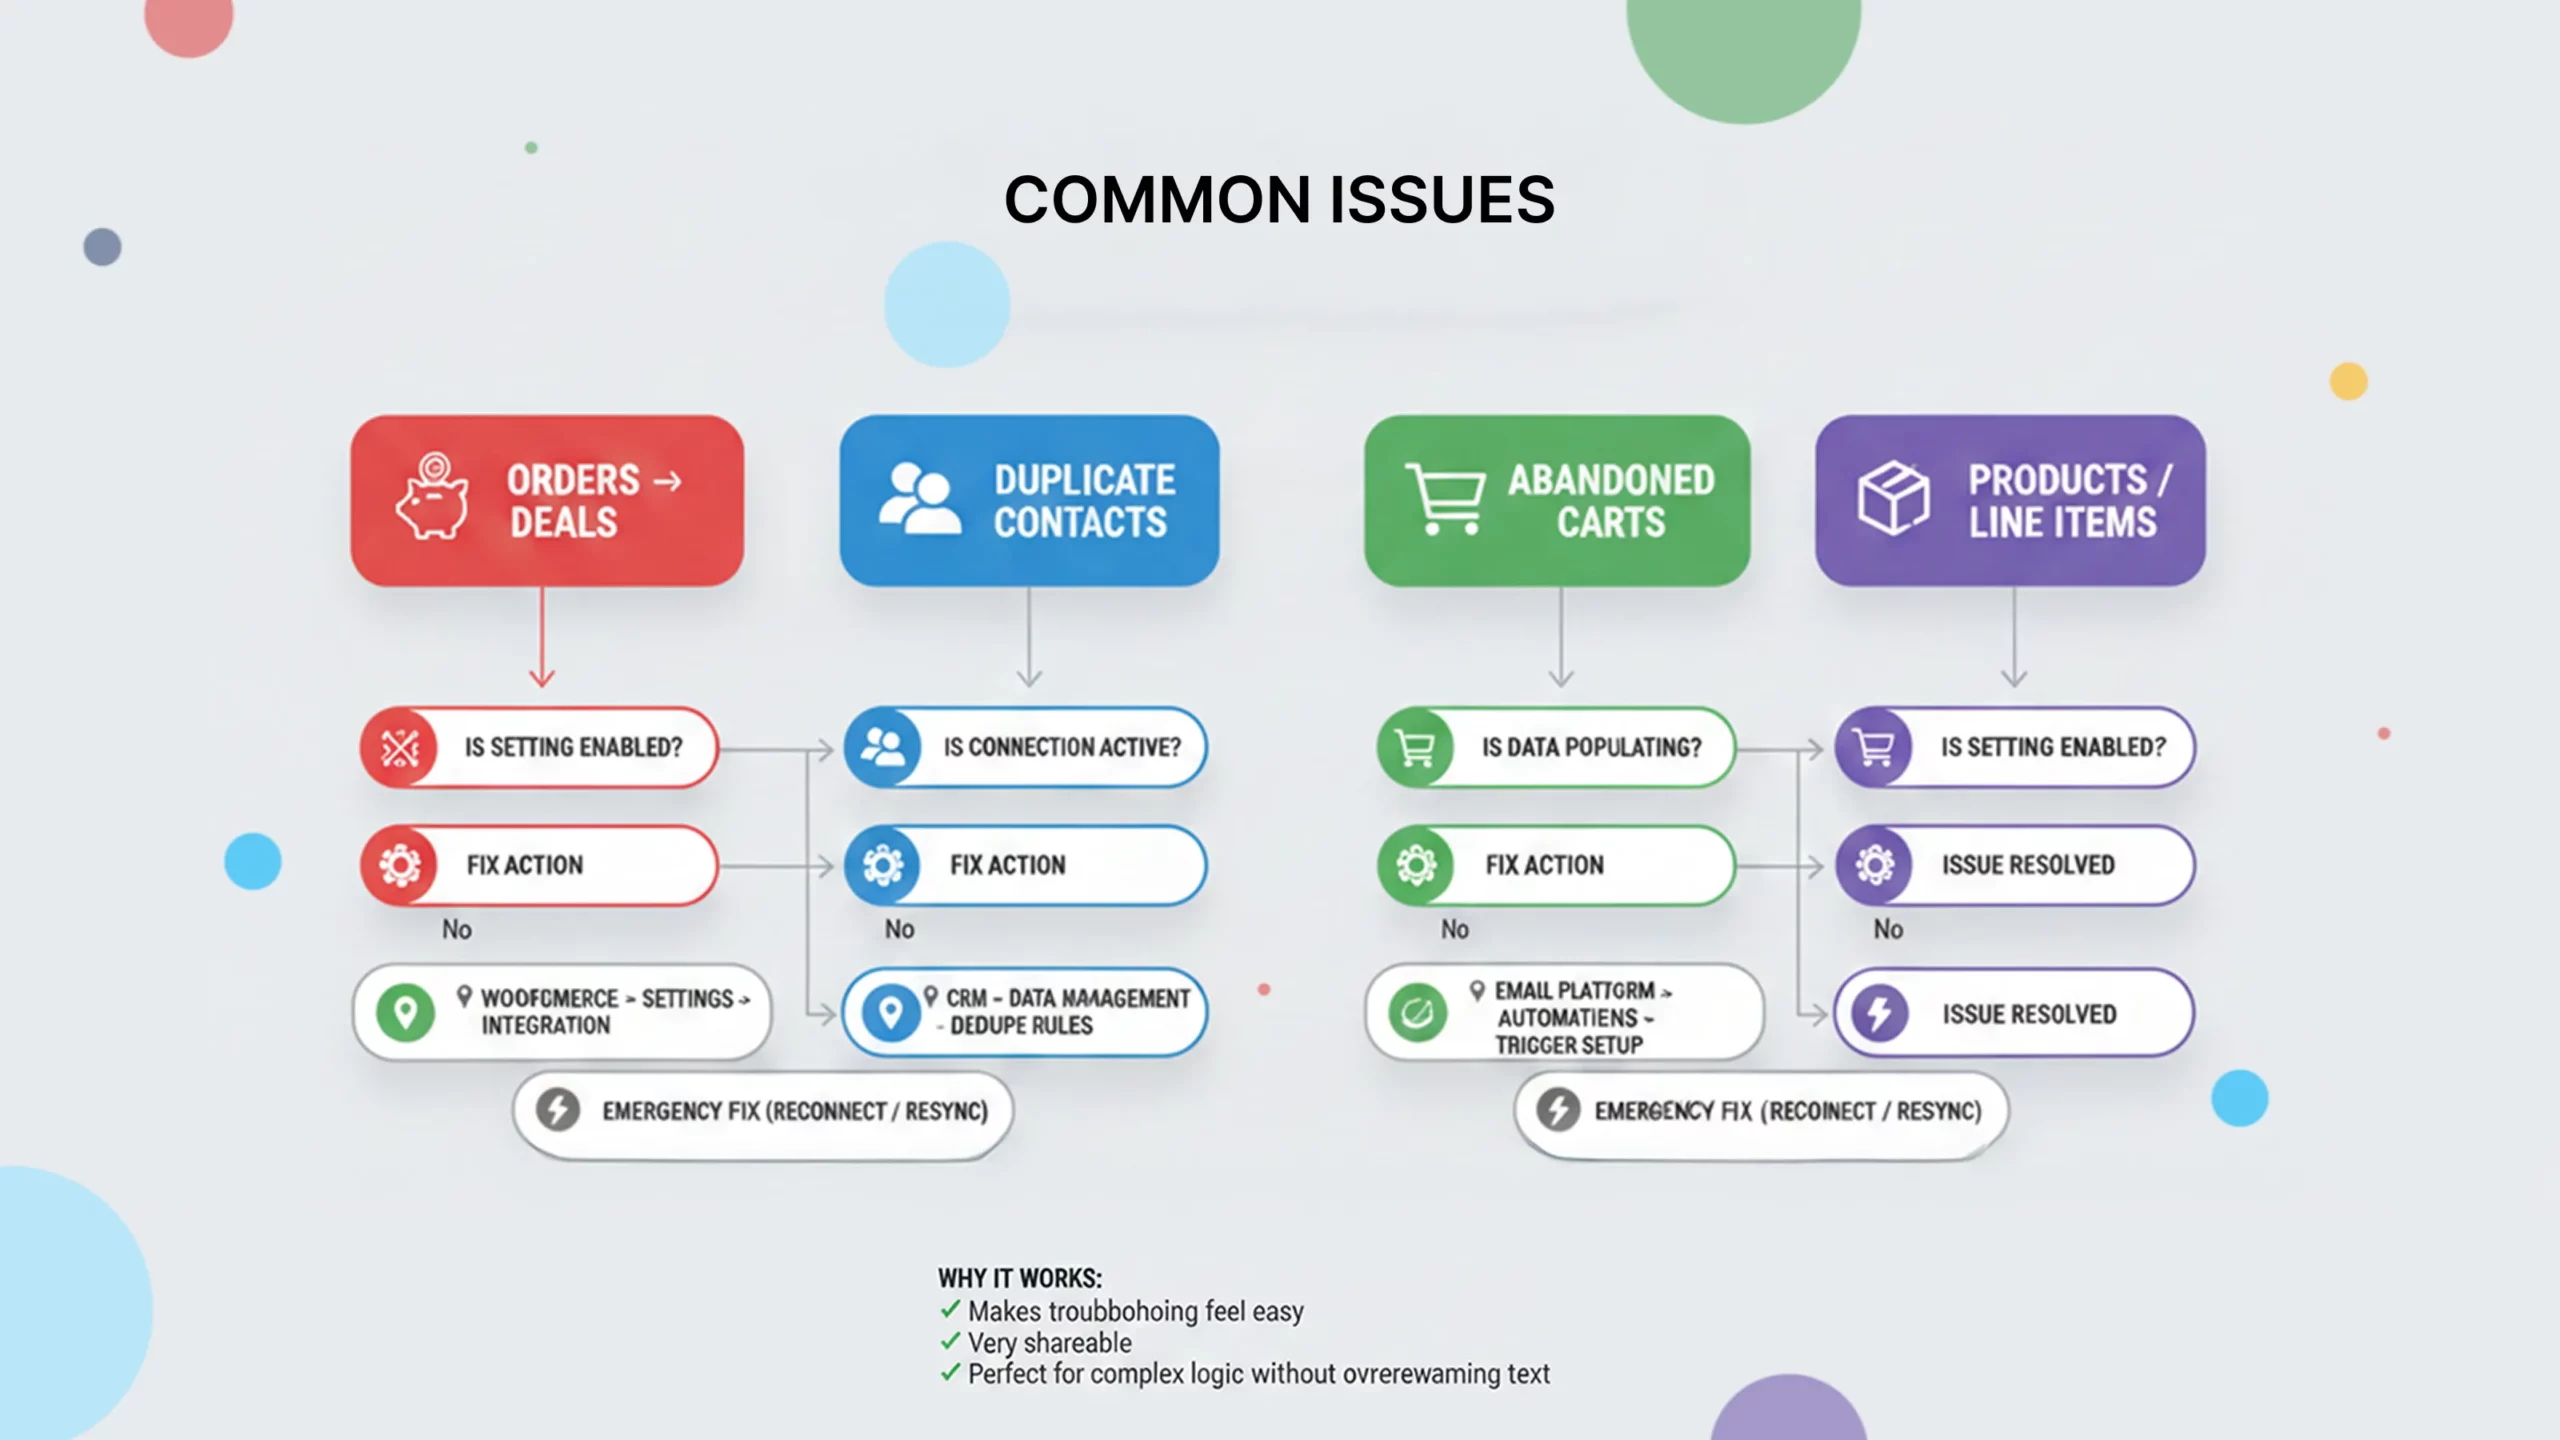
Even with perfect setup, issues arise. Here’s how to fix the most common problems quickly.
Issue 1: Orders Not Syncing as Deals
Symptoms:
- Orders complete in WooCommerce
- No corresponding deals appear in HubSpot
- Contact is created but deal is missing
Solutions: Check 1: Plugin Settings
- Navigate to WooCommerce → Settings → Integration → HubSpot
- Verify “Sync Orders as Deals” is enabled
- Check deal pipeline is selected correctly
Check 2: Connection Status
- Go to HubSpot → Settings in WordPress
- Look for “Connected” status
- If disconnected, click “Reconnect to HubSpot”
Check 3: Order Status Mapping
- Verify order statuses are mapped to deal stages
- Ensure the order reached a “syncing” status (usually “Processing” or “Completed”)
- Check if order status changed too quickly (some plugins have timing issues)
Check 4: HubSpot Permissions
- Confirm your HubSpot user has permission to create deals
- Verify API key hasn’t expired
- Check rate limits haven’t been exceeded
Emergency Fix:
- Disconnect and reconnect integration
- Run historical data import for missed orders
- Contact HubSpot support if issue persists
Issue 2: Duplicate Contacts Being Created
Symptoms:
- Same customer appears multiple times in HubSpot
- Different email variations (uppercase/lowercase/spacing)
- Guest checkouts creating duplicates
Solutions: Prevention Strategy:
- Enable HubSpot’s automatic deduplication:
- Settings → Properties → Contact Properties
- Set Email as primary identifier
- Enable “Automatic Associate Companies”
- Configure WordPress email normalization:
- Install “Email Address Normalizer” plugin
- Force lowercase email addresses
- Trim whitespace automatically
Cleanup Strategy:
- Use HubSpot’s Duplicate Management:
- Contacts → Duplicate Management
- Review potential duplicates
- Merge carefully (primary record should be the one with most data)
- Create workflow to prevent future duplicates:
- Enrollment: Contact Email contains uppercase letters
- Action: Update contact email to lowercase
- Result: Prevents case-sensitive duplicates
Issue 3: Abandoned Cart Emails Not Sending
Symptoms:
- Carts are being abandoned
- Workflow shows as active
- No emails being delivered
Diagnosis Steps: Step 1: Verify Cart Tracking
- WooCommerce → Settings → Integration → HubSpot
- Confirm “Track Abandoned Carts” is enabled
- Check abandonment threshold (default 30 minutes)
- Verify cart value minimum is set appropriately
Step 2: Check Workflow Status
- HubSpot → Automation → Workflows
- Find abandoned cart workflow
- Verify workflow is “On”
- Check enrollment criteria
Step 3: Review Contact Properties
- Open test contact in HubSpot
- Check if “Recent Cart Abandonment” property is populating
- Verify “Cart Total” value is being set
- Confirm contact meets all enrollment triggers
Step 4: Test Email Deliverability
- Send test email from workflow
- Check spam folders
- Verify sender email is authenticated (SPF/DKIM)
- Review email content for spam triggers
Common Fixes:
- Adjust workflow re-enrollment settings
- Reduce cart value minimum threshold
- Extend abandonment time threshold
- Update email authentication records
Issue 4: Product Sync Issues
Symptoms:
- Products not appearing in HubSpot
- Product information incorrect or outdated
- Line items missing from deals
Solutions: For Missing Products:
- Check plugin settings: Confirm product sync is enabled
- Verify product status: Only published products sync by default
- Check categories: If using category filter, confirm product is in selected categories
- Manual sync: Use “Sync All Products Now” button in plugin settings
For Incorrect Data:
- Review field mapping: WooCommerce → Settings → Integration → HubSpot → Product Mapping
- Update property mapping to include all needed fields
- Force resync: Delete product in HubSpot, then trigger new sync
For Line Item Issues:
- Verify product exists in HubSpot product library before order is placed
- Check deal-product association settings
- Ensure SKU matching is configured correctly
Measuring Success: Key Metrics to Track
You can’t improve what you don’t measure. These metrics tell you if your integration is delivering ROI.
Revenue Metrics
- Cart Recovery Rate
- Formula: (Recovered Carts / Total Abandoned Carts) × 100
- Benchmark: 15-25% is excellent
- Tracking: HubSpot Dashboard + WooCommerce Reports
- Revenue from Recovered Carts
- Formula: Sum of all completed orders from abandoned cart workflows
- Benchmark: 10-15% of total revenue for optimized stores
- Tracking: Create custom report in HubSpot
- Customer Lifetime Value (CLV)
- Formula: Average Purchase Value × Purchase Frequency × Customer Lifespan
- Benchmark: 3x higher for integrated stores vs non-integrated
- Tracking: Custom contact property + report
- Revenue per Email
- Formula: Total Revenue / Number of Marketing Emails Sent
- Benchmark: $0.50-$2.00 per email for eCommerce
- Tracking: HubSpot Marketing Email Analytics
Engagement Metrics
- Repeat Purchase Rate
- Formula: (Customers with 2+ Orders / Total Customers) × 100
- Benchmark: 25-35% within 6 months
- Tracking: Contact list filters + reporting
- Email Open Rate
- Formula: (Emails Opened / Emails Delivered) × 100
- Benchmark: 20-30% for eCommerce automated emails
- Tracking: HubSpot email performance
- Click-Through Rate
- Formula: (Clicks / Emails Delivered) × 100
- Benchmark: 3-8% for eCommerce campaigns
- Tracking: HubSpot email analytics
- Review Submission Rate
- Formula: (Reviews Submitted / Review Requests Sent) × 100
- Benchmark: 8-15% is strong
- Tracking: Custom workflow + reporting
Operational Metrics
- Time Saved on Manual Entry
- Formula: Hours Previously Spent × Hourly Rate
- Benchmark: 10-20 hours per week for growing stores
- Tracking: Before/after time studies
- Data Accuracy Rate
- Formula: (Correct Records / Total Records) × 100
- Benchmark: >95% accuracy with automation
- Tracking: Regular data audits
- Sync Success Rate
- Formula: (Successful Syncs / Total Sync Attempts) × 100
- Benchmark: >98% is healthy
- Tracking: Plugin logs + HubSpot integration health
Creating Your ROI Dashboard
Build a custom HubSpot dashboard tracking these metrics: Setup Steps:
- HubSpot → Reports → Dashboards → Create Dashboard
- Name it: “WooCommerce Integration ROI”
- Add these reports:
- Cart Recovery Performance (bar chart)
- Revenue Attribution by Source (donut chart)
- Customer Lifetime Value Trend (line chart)
- Email Campaign Performance (table)
- Workflow Enrollment by Type (bar chart)
- Repeat Purchase Rate (single value)
- Time Period Comparison (comparison chart)
Review Frequency: Weekly for first 3 months, then monthly
Advanced Tips for Power Users
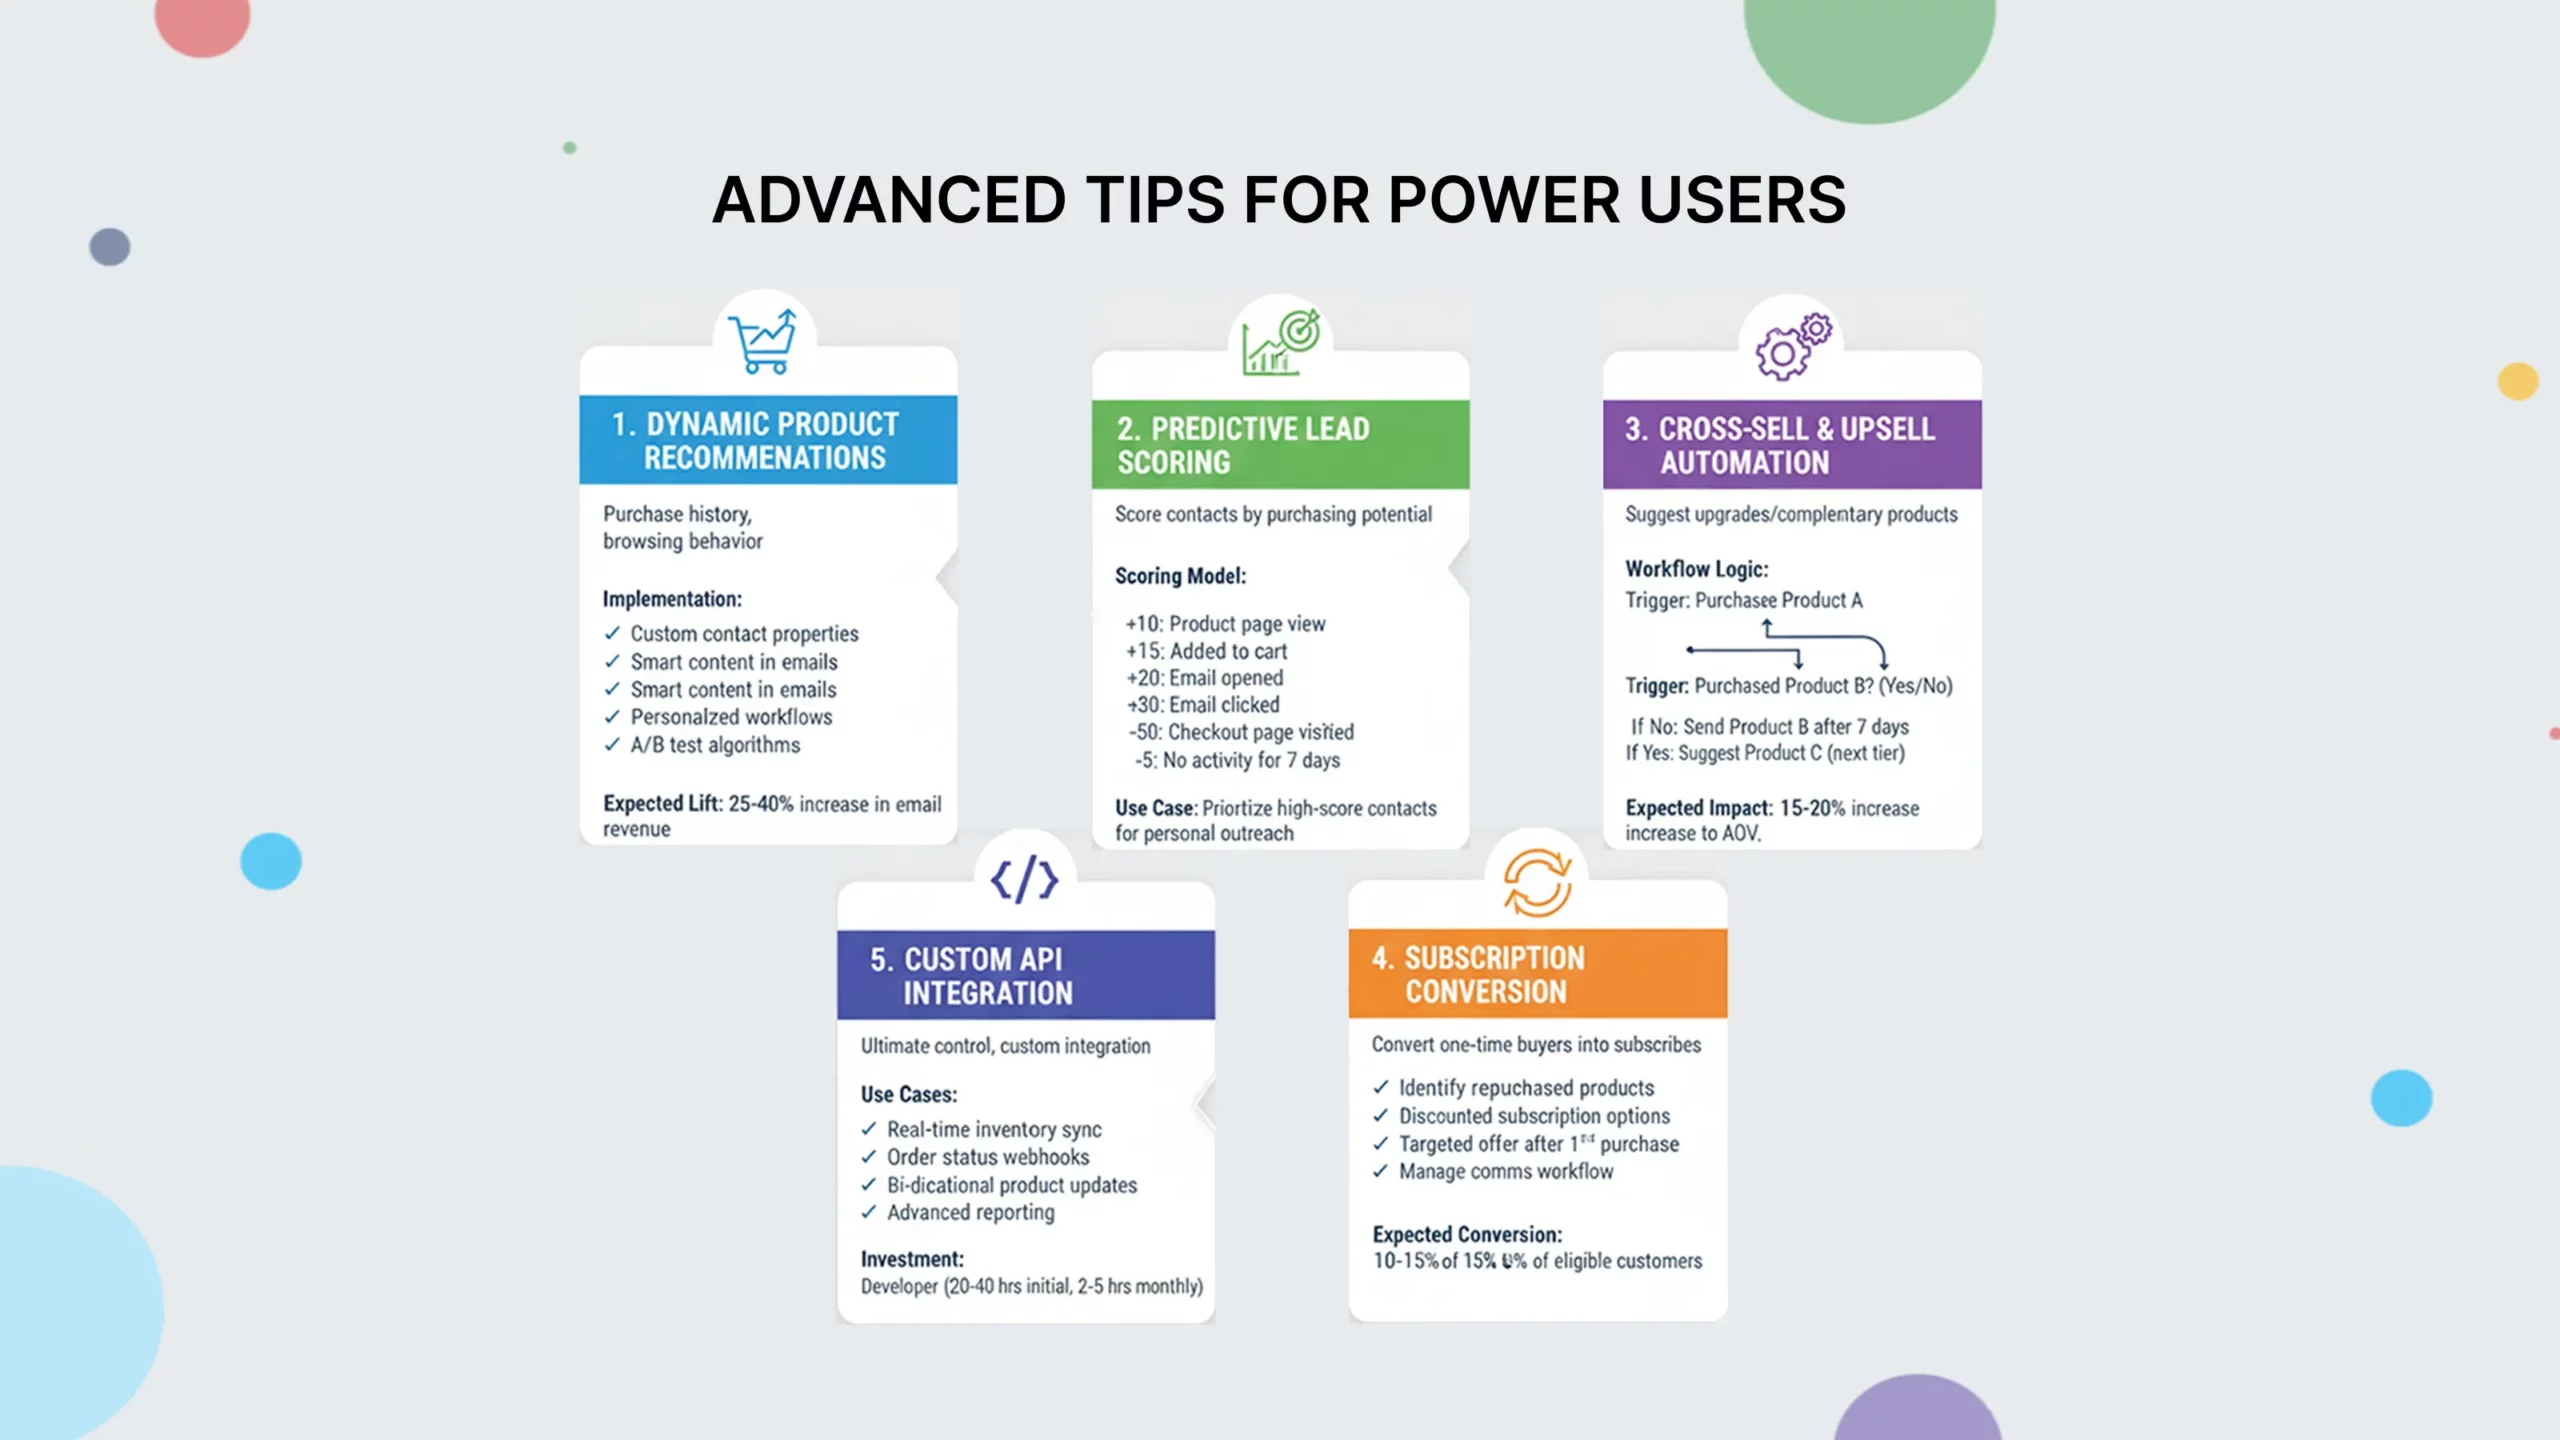
These are more advanced strategies that require your integration to a new level once you have been acquainted with the basics.
1. Dynamic Product Recommendations
Dynamic recommendation of products through purchase history and browsing behavior:
Implementation:
- Add custom contact properties of product categories viewed.
- Build smart content in emails showing recommended products
- Personalize recommendations in workflows with if/then logic.
- Recommendation algorithms of A/B tests.
Expected Lift: 25-40% increase in email-driven revenue
2. Predictive Lead Scoring
Score contacts on the basis of purchasing potential:
Scoring Model:
- +10 points: Product page view
- +15 points: Added to cart
- +20 points: Email opened
- +30 points: Email clicked
- +50 points: Checkout page visited
- -5 points: No activity for 7 days
Use Case: Prioritize high-score contacts for personal outreach
3. Cross-Sell & Upsell Automation
Automatically suggest upgrades or complementary products:
Workflow Logic:
- Trigger: Customer purchases Product A
- Check: Has the customer purchased Product B (complementary)?
- If No: Send Product B recommendation after 7 days
- If Yes: Suggest Product C (next tier)
Expected Impact: 15-20% increase in average order value
4. Subscription Conversion
Convert one-time buyers into subscribers:
Strategy:
- Identify products commonly repurchased
- Create subscription options with discount
- Send targeted offer after first purchase
- Build workflow to manage subscription communications
Expected Conversion: 10-15% of eligible customers
5. Custom API Integration
For ultimate control, build custom API integration:
Use Cases:
- Real-time inventory sync
- Custom order status webhooks
- Bi-directional product updates
- Advanced customer segmentation
- Custom reporting
Investment: Requires developer (20-40 hours initial, 2-5 hours monthly maintenance)
Frequently Asked Questions
Does the WooCommerce integration work with HubSpot’s free plan?
HubSpot Free does have some basic features, such as contact syncing, creating deals, and tracking abandoned carts. Sophisticated workflow-based automation, customized reporting, and selected marketing functionalities are, however, paid HubSpot plans (Starter, Professional, or Enterprise)
How long does it take for data to sync between WooCommerce and HubSpot?
Most of the data will be synchronized in real-time or within 5-10 minutes using the official plugin. The creation of orders is normally synchronized when the order is completed. An import of historical data may require several hours basing on the amount of records (around 500-1000 records per hour).
Will this integration slow down my WooCommerce store?
No. The functionality of the plugin is asynchronous, i.e. the data syncing occurs in the background and does not impact the performance of your store in the frontend. You have the same speed of checkout and page load time.
Can I sync guest checkouts to HubSpot?
Yes. With the option “Create contacts when making guest checkouts turned on the HubSpot contacts are created of customers who make purchases without creating a WooCommerce account. This is so that you have all the customer details irrespective of their check out method.
What happens if I disconnect the integration?
Current information within HubSpot will not be lost. Already synced contacts, deals and products will remain in your HubSpot account. Nevertheless, the new orders and customer information will cease to synchronize. To prevent loss of data, before disconnection, export any important information.
Can I customize which order statuses sync to HubSpot?
Yes. Under the WooCommerce settings in the HubSpot application, you may map certain WooCommerce order statuses to deal stages. You can as well decide to not have some statuses synched at all (such as you may not want draft orders to build deals).
How do refunds and cancellations sync?
The WooCommerce order refund or order cancellation triggers an update in HubSpot deal stage (which is usually Closed Lost). The initial agreement is stored in HubSpot with revised status, maintaining historical data to report on it.
Can I segment customers by products purchased?
Absolutely. The product information is synchronized with the deals and you are able to make lists and segments of certain products bought, product categories, order values, purchase frequency etc.
Does this work with WooCommerce Subscriptions?
Yes, the integration supports WooCommerce Subscriptions. HubSpot has new deals when you renew subscriptions and you can use custom properties and workflows to monitor subscription status.
How do I handle multiple currencies?
HubSpot allows the usage of multiple currencies. You can activate the currencies that you utilize in WooCommerce in your HubSpot account settings. The integration will match currency details with every deal, so that there will be proper reporting.
Next Steps: Implementing Your Integration
At this point, you have all you need to integrate WooCommerce with HubSpot successfully and begin automated revenue generation.
Your Implementation Roadmap:
Week 1: Setup & Configuration
- Install HubSpot for WooCommerce plugin
- Configure sync settings and field mapping
- Import historical data
- Verify tracking code installation
- Test with sample orders
Week 2: Core Workflows
- Build abandoned cart recovery workflow
- Create post-purchase thank you sequence
- Set up review request automation
- Configure welcome series for new customers
Week 3: Segmentation & Testing
- Create customer segments
- Build VIP customer workflow
- Set up win-back campaigns
- Begin A/B testing email timing
Week 4: Optimization
- Review first month metrics
- Adjust workflow timing based on results
- Refine segmentation criteria
- Scale successful campaigns
Ongoing: Monitor & Improve
- Weekly metric review
- Monthly workflow optimization
- Quarterly data audit
- Continuous A/B testing
Ready to Get Started?
The WooCommerce-HubSpot integration is not merely a tech relationship, it is a paradigm shift in your approach to marketing to your clients. You are leaving reactive, manual marketing to proactive, automated customer experiences to grow revenues consistently.
The most successful stores are not always the largest and most advanced. It is they who act, who implement in a systematic manner and who optimize constantly.
WooCommerce-HubSpot? You need some professional assistance. We are the eCommerce integration agency that has assisted hundreds of shops in executing these very strategies. We do all the early preparation and go all the way to automating your workflow, and you can concentrate on business development rather than on technical setup.
Contact us for a free integration consultation and let’s build your automated revenue engine together.


