API Rate Limiting & Security Implementation Guide

|
Getting your Trinity Audio player ready...
|
Why Rate Limiting Is Non-Negotiable
Imagine shipping an API without rate limiting. Now imagine one misconfigured client sending 10,000 requests per minute to your server. Your database connection pool fills up. Response times spike. Then every other user on your platform starts experiencing errors — because one bad actor consumed all available resources.
That scenario happens in production every day. Moreover, it’s not always a malicious attack. Sometimes it’s a buggy mobile app in a retry loop, an overeager partner script, or a developer testing without realising the cost of each call.
Rate limiting solves this. It controls how many requests a client can make within a defined time window. Without it, your API is exposed to abuse, resource exhaustion, and cascading failures. With it, you get fair resource distribution, built-in protection, and a much more stable system under load.
This guide walks you through everything you need to implement rate limiting correctly — from choosing the right algorithm to writing the actual production code.
What Is API Rate Limiting?
API rate limiting is a technique that restricts how often a client can call your API within a set time period. When a client exceeds that limit, your API returns an HTTP 429 Too Many Requests response — and the client must wait before trying again.
Think of it like a turnstile at a subway station. The turnstile allows a steady flow of passengers through. However, if someone tries to push through too fast, the gate locks. The person waits, the gate resets, and normal flow resumes. Rate limiting works the same way — it controls the pace, not just the total volume.
Key Definition
Rate limiting = controlling request frequency per client within a time window. Throttling = slowing down requests rather than blocking them. Both are useful tools, and many production systems combine them.
Why Your API Needs Rate Limiting
There are four concrete problems that rate limiting prevents. Understanding each one helps you decide where and how aggressively to limit.
| Threat | What Happens Without Rate Limiting | How Rate Limiting Helps |
| Resource exhaustion | One client monopolises CPU, memory, and DB connections | Caps per-client consumption so shared resources stay available |
| DDoS attacks | Flood of requests overwhelms your servers | Blocks excessive traffic before it reaches your backend |
| Credential stuffing | Attacker tries thousands of username/password combos | Strict limits on auth endpoints make brute force impractical |
| API scraping | Competitor systematically harvests your data | Makes scraping at scale slow enough to be uneconomical |
| Runaway clients | Buggy script in a retry loop hammers your API | Cuts off the loop automatically without manual intervention |
The 4 Rate Limiting Algorithms Explained
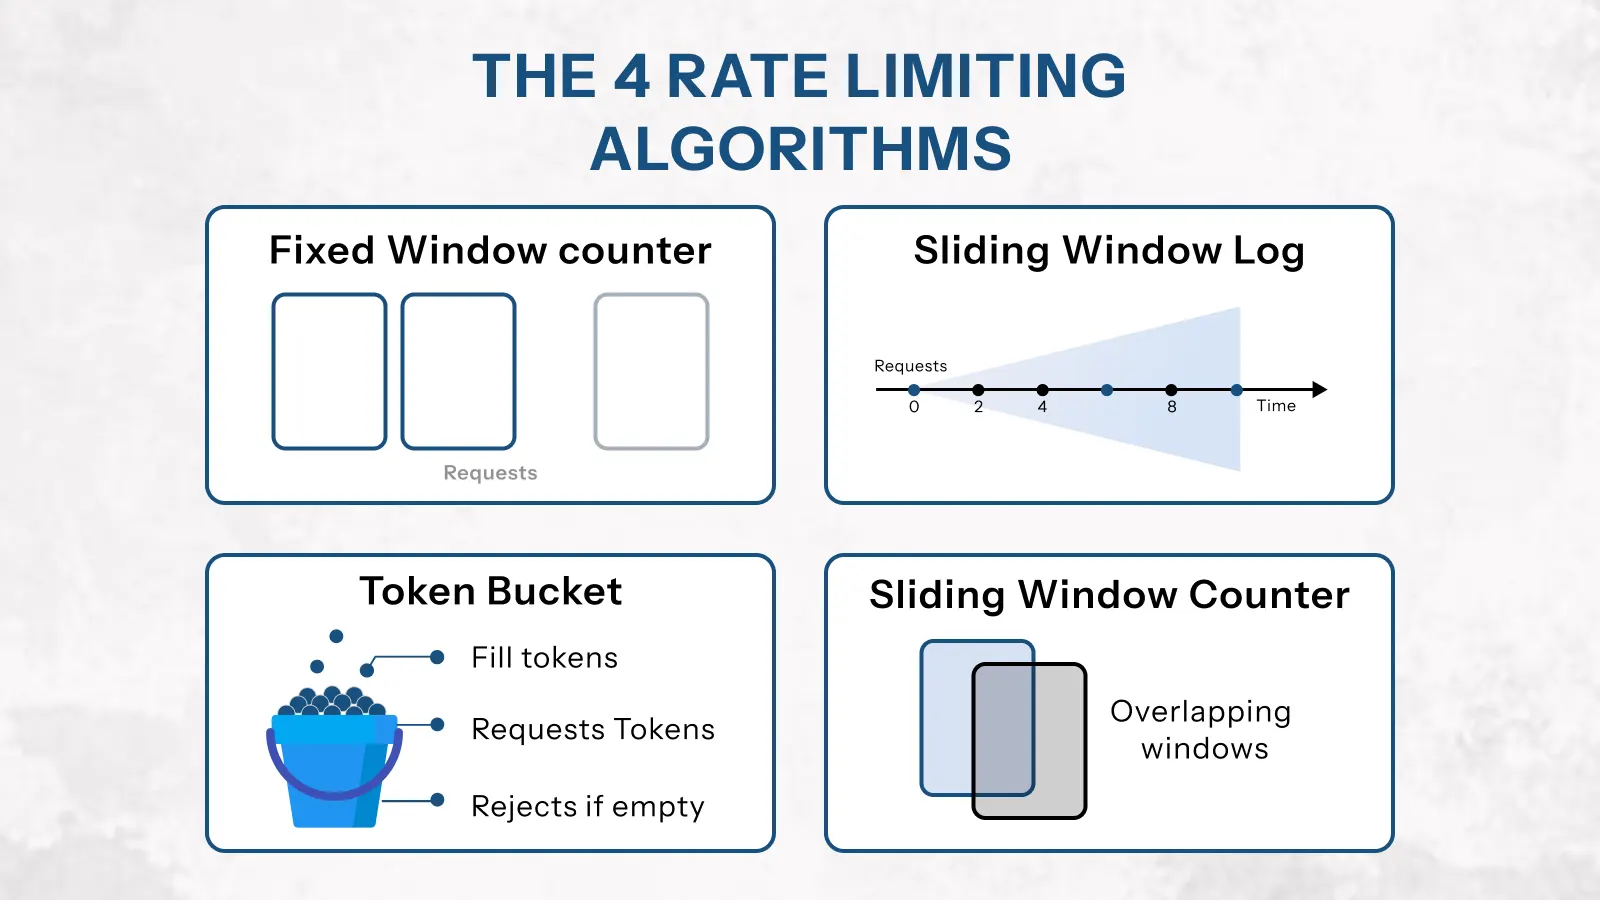
Each rate limiting algorithm handles traffic differently. Choosing the wrong one for your use case leads to either poor protection or poor user experience. Therefore, it’s worth understanding how each works before you implement anything.
1. Fixed Window Counter
This is the simplest approach. You divide time into fixed windows — for example, 0–60 seconds — and count requests within each window. When the count hits the limit, further requests are rejected until the window resets.
It’s fast and easy to implement. However, it has a known weakness: the boundary problem. A client can send 100 requests in the last second of one window and 100 more in the first second of the next window — effectively doubling the limit at the boundary.
Use fixed window when: you need a quick implementation and occasional boundary spikes are acceptable.
// Fixed window — Redis implementation
async function fixedWindowLimit(userId, limit = 100, windowSecs = 60) {
  const key = `rate:fixed:${userId}:${Math.floor(Date.now() / (windowSecs * 1000))}`;
  const count = await redis.incr(key);
  if (count === 1) await redis.expire(key, windowSecs); // Set TTL on first request
  return { allowed: count <= limit, count, limit };
}
2. Sliding Window Log
Instead of fixed time buckets, this algorithm tracks the exact timestamp of every request. When a new request arrives, it removes timestamps older than the window and counts what remains. If the count is under the limit, the request goes through.
This approach is highly accurate and fair. It eliminates the boundary problem entirely. The trade-off is memory — storing individual timestamps for every client is expensive at high scale.
Use sliding window log when: precision matters more than storage efficiency, and traffic volume is moderate.
// Sliding window log — Redis sorted set async function slidingWindowLog(userId, limit = 100, windowMs = 60000) { const now = Date.now(); const windowStart = now - windowMs; const key = `rate:sliding:${userId}`; await redis.zremrangebyscore(key, '-inf', windowStart); // Remove old entries const count = await redis.zcard(key); // Count remaining if (count >= limit) return { allowed: false, count, limit }; await redis.zadd(key, now, `${now}-${Math.random()}`); // Log this request await redis.pexpire(key, windowMs); return { allowed: true, count: count + 1, limit };
3. Token Bucket
Picture a bucket that holds tokens. Each API request consumes one token. The bucket refills at a fixed rate — for example, 10 tokens per second. If the bucket is full and a burst of requests arrives, those requests can all go through immediately. After the bucket empties, new requests must wait for tokens to refill.
This algorithm handles burst traffic gracefully. It’s the algorithm behind most major API platforms, including AWS API Gateway and Stripe. Furthermore, it maps naturally to the idea of ‘credit’ — users who make fewer requests build up credit they can spend later.
Use token bucket when: you want to allow short bursts while enforcing a long-term average rate.
// Token bucket — Redis with Lua script for atomicity
const tokenBucketScript = `
  local key = KEYS[1]
  local capacity = tonumber(ARGV[1])
  local refill_rate = tonumber(ARGV[2])   -- tokens per second
  local now = tonumber(ARGV[3])            -- current timestamp in ms
  local requested = tonumber(ARGV[4])      -- tokens needed (usually 1)

  local data = redis.call('HMGET', key, 'tokens', 'last_refill')
  local tokens = tonumber(data[1]) or capacity
  local last_refill = tonumber(data[2]) or now

  -- Calculate tokens earned since last request
  local elapsed = (now - last_refill) / 1000
  tokens = math.min(capacity, tokens + elapsed * refill_rate)

  if tokens >= requested then
    tokens = tokens - requested
    redis.call('HMSET', key, 'tokens', tokens, 'last_refill', now)
    redis.call('PEXPIRE', key, 60000)
    return 1  -- allowed
  end
  return 0    -- denied
`

async function tokenBucketLimit(userId, capacity = 100, refillRate = 10) {
  const result = await redis.eval(
    tokenBucketScript, 1,
    `rate:token:${userId}`,
    capacity, refillRate, Date.now(), 1
  );
  return { allowed: result === 1 };
}
4. Sliding Window Counter (Recommended Default)
This algorithm combines the simplicity of fixed windows with the accuracy of sliding windows. It calculates a weighted count using two adjacent fixed windows — giving a smooth approximation of the true sliding window without the memory cost.
For example, if you’re 75% through the current window, it calculates: (25% × previous window count) + current window count. This gives a fair, accurate result at minimal computational cost.
Use sliding window counter when: you want the best balance of accuracy and performance for high-traffic production APIs. This is the recommended default for most teams.
// Sliding window counter — efficient and accurate
async function slidingWindowCounter(userId, limit = 100, windowSecs = 60) {
  const now = Date.now();
  const windowMs = windowSecs * 1000;
  const currentWindow = Math.floor(now / windowMs);
  const prevWindow = currentWindow - 1;
  const windowProgress = (now % windowMs) / windowMs; // 0.0 → 1.0

  const currentKey = `rate:sw:${userId}:${currentWindow}`;
  const prevKey    = `rate:sw:${userId}:${prevWindow}`;

  const [prevCount, currentCount] = await Promise.all([
    redis.get(prevKey).then(v => parseInt(v) || 0),
    redis.incr(currentKey),
  ]);

  if (currentCount === 1) await redis.expire(currentKey, windowSecs * 2);

  // Weighted count: older window contributes less as time passes
  const weightedCount = prevCount * (1 - windowProgress) + currentCount;
  return { allowed: weightedCount <= limit, count: Math.ceil(weightedCount), limit };
}
| Algorithm | Accuracy | Memory Usage | Burst Handling | Best For |
| Fixed Window | Low — boundary spikes | Very low | Poor | Simple internal APIs, quick setup |
| Sliding Window Log | High — exact | High | Accurate | Low-volume APIs where precision matters |
| Token Bucket | Medium | Low | Excellent | APIs that allow bursts — AWS, Stripe pattern |
| Sliding Window Counter | High — approximate | Very low | Good | ✅ Most production APIs — recommended default |
How to Implement API Rate Limiting in Node.js
Now that you understand the algorithms, let’s build a production-ready rate limiting setup in Node.js with Express and Redis. This implementation covers everything you need: per-user limits, per-endpoint limits, response headers, and a proper 429 handler.
Step 1 — Install Dependencies
npm install express-rate-limit rate-limit-redis ioredis

# express-rate-limit   — the core middleware
# rate-limit-redis     — Redis store adapter (distributed)
# ioredis              — Redis client (faster than node-redis for this use case)
Step 2 — Set Up the Redis Client
Always use a dedicated Redis client for rate limiting. This keeps it isolated from your cache and session stores — so a Redis issue in one area doesn’t affect the others.
// config/redis.js
const Redis = require('ioredis');

const rateLimitRedis = new Redis({
  host: process.env.REDIS_HOST || 'localhost',
  port: process.env.REDIS_PORT || 6379,
  password: process.env.REDIS_PASSWORD,
  enableOfflineQueue: false,  // Fail fast if Redis is down
  lazyConnect: true,
  retryStrategy: (times) => {
    if (times > 3) return null; // Stop retrying after 3 attempts
    return Math.min(times * 100, 1000);
  },
});

rateLimitRedis.on('error', (err) => {
  console.error('Rate limit Redis error:', err.message);
});

module.exports = { rateLimitRedis };
Step 3 — Create Rate Limiter Middleware
Build separate limiters for different endpoint types. General API endpoints need different limits than authentication endpoints. Moreover, sensitive actions like password resets need stricter protection than regular reads.
// middleware/rateLimiter.js
const rateLimit = require('express-rate-limit');
const { RedisStore } = require('rate-limit-redis');
const { rateLimitRedis } = require('../config/redis');

// Standard error response — consistent with your API error envelope
const rateLimitHandler = (req, res) => {
  res.status(429).json({
    error: {
      code: 'RATE_LIMIT_EXCEEDED',
      message: 'Too many requests. Please slow down and try again.',
      retryAfter: Math.ceil(req.rateLimit.resetTime / 1000),
      limit: req.rateLimit.limit,
      remaining: 0,
    }
  });
};

// ── General API limiter — 100 req/min per user ──────────────────
const apiLimiter = rateLimit({
  windowMs: 60 * 1000,
  max: 100,
  standardHeaders: true,      // Returns RateLimit-* headers (RFC 6585)
  legacyHeaders: false,       // Disable deprecated X-RateLimit-* headers
  keyGenerator: (req) => req.user?.id ?? req.ip, // Per-user, fallback to IP
  store: new RedisStore({ sendCommand: (...args) => rateLimitRedis.call(...args) }),
  handler: rateLimitHandler,
  skip: (req) => req.path === '/health', // Never limit health checks
});

// ── Auth limiter — 10 attempts per 15 minutes ───────────────────
const authLimiter = rateLimit({
  windowMs: 15 * 60 * 1000,  // 15 minutes
  max: 10,                   // Strict — protects against brute force
  standardHeaders: true,
  legacyHeaders: false,
  keyGenerator: (req) => {
    // Limit by IP + email combo to prevent account enumeration
    return `${req.ip}:${req.body?.email ?? 'unknown'}`;
  },
  store: new RedisStore({ sendCommand: (...args) => rateLimitRedis.call(...args) }),
  handler: rateLimitHandler,
});

// ── Password reset limiter — 3 requests per hour ────────────────
const passwordResetLimiter = rateLimit({
  windowMs: 60 * 60 * 1000,  // 1 hour
  max: 3,
  standardHeaders: true,
  legacyHeaders: false,
  keyGenerator: (req) => req.body?.email ?? req.ip,
  store: new RedisStore({ sendCommand: (...args) => rateLimitRedis.call(...args) }),
  handler: rateLimitHandler,
});

module.exports = { apiLimiter, authLimiter, passwordResetLimiter };
Step 4 — Apply Limiters to Your Routes
Apply the general limiter globally. Then apply specific, stricter limiters to sensitive endpoints on top of the global one. This layered approach gives you both broad protection and fine-grained control.
// app.js
const express = require('express');
const { apiLimiter, authLimiter, passwordResetLimiter } = require('./middleware/rateLimiter');

const app = express();
app.use(express.json());

// ── Global limiter — applies to every endpoint ──────────────────
app.use('/api/', apiLimiter);

// ── Strict limiters on sensitive endpoints ──────────────────────
app.post('/api/v1/auth/login',          authLimiter,          loginHandler);
app.post('/api/v1/auth/register',        authLimiter,          registerHandler);
app.post('/api/v1/auth/password-reset',  passwordResetLimiter, passwordResetHandler);

// ── Regular endpoints use only the global limiter ───────────────
app.get('/api/v1/users',    authenticate, getUsersHandler);
app.get('/api/v1/orders',   authenticate, getOrdersHandler);
Step 5 — Rate Limit Response Headers
Always expose rate limit information in response headers. This lets clients self-regulate before they hit the limit. It also reduces the number of 429 responses in practice, because well-built clients will slow down when they see remaining requests dropping.
The standardHeaders: true option in express-rate-limit adds these automatically. However, it’s important to understand what each header means.
| Header | Value Example | What It Tells the Client |
| RateLimit-Limit | 100 | Maximum requests allowed in the current window |
| RateLimit-Remaining | 47 | Requests left in the current window |
| RateLimit-Reset | 1709042340 | Unix timestamp when the window resets |
| Retry-After | 43 | Seconds to wait before retrying (sent only on 429) |
// Example response headers on a successful request
HTTP/1.1 200 OK
RateLimit-Limit: 100
RateLimit-Remaining: 47
RateLimit-Reset: 1709042340

// Example response on a rate-limited request
HTTP/1.1 429 Too Many Requests
RateLimit-Limit: 100
RateLimit-Remaining: 0
RateLimit-Reset: 1709042340
Retry-After: 43

{ "error": { "code": "RATE_LIMIT_EXCEEDED", "retryAfter": 43 } }
How to Set the Right Rate Limits
Setting rate limits without data is guesswork. Set them too high and they provide no protection. Set them too low and you block legitimate users — which is just as damaging as no limit at all.
Here’s how to approach limit-setting systematically, both at launch and as your API matures.
Limits by Endpoint Type
Different endpoints carry different risk profiles and different resource costs. Therefore, a one-size-fits-all limit is always the wrong choice. Use these baselines as a starting point, then adjust based on your actual traffic data.
| Endpoint Type | Recommended Limit | Window | Reason |
| General read (GET) | 100–200 req | per minute | Low cost, cacheable — can be generous |
| Write operations (POST/PUT) | 30–60 req | per minute | More expensive — DB writes, business logic |
| Login / Auth | 5–10 attempts | per 15 minutes | Brute force protection — be strict here |
| Password reset | 3 requests | per hour | Prevents email flooding and enumeration |
| Payment / checkout | 10 requests | per minute | High-value action — fraud prevention |
| Search / query | 30 req | per minute | Can be DB-intensive — protect accordingly |
| File upload | 10 req | per minute | Bandwidth and storage cost — keep tight |
| Webhook delivery | 60 req | per minute | Depends on consumer subscription tier |
Tiered Rate Limits by User Plan
If your API serves users on different subscription plans, flat limits don’t work. A free-tier user and an enterprise customer have very different legitimate usage patterns. Tiered rate limits solve this — and they also serve as a natural upgrade incentive.
// Tiered rate limiting based on user subscription
const TIER_LIMITS = {
  free:       { requests: 100,  windowMs: 60 * 1000 },   // 100/min
  pro:        { requests: 500,  windowMs: 60 * 1000 },   // 500/min
  enterprise: { requests: 2000, windowMs: 60 * 1000 },   // 2000/min
};

function getTierLimiter(req, res, next) {
  const tier = req.user?.subscriptionTier ?? 'free';
  const { requests, windowMs } = TIER_LIMITS[tier] || TIER_LIMITS.free;

  // Attach tier-specific limit info to request for downstream use
  req.tierLimit = { requests, windowMs, tier };
  next();
}

// Apply tier detection before rate limiter
app.use('/api/', getTierLimiter, dynamicRateLimiter);
Start Conservative, Then Adjust
At launch, you don’t have usage data. So start with conservative limits — lower than you think you need. Then monitor your 429 response rate in your logging system. If legitimate users are regularly hitting limits, raise them. If you’re seeing abuse patterns, tighten specific endpoints.
A good target: fewer than 0.1% of requests from legitimate users should result in a 429 response. If you’re seeing more than that, your limits are too tight.
How to Find Your Baseline
Before setting limits, run your API for 2–4 weeks in staging or limited production. Collect p99 request rates per endpoint per user. Then set your limit at 2–3× the observed p99 for each endpoint type. This gives legitimate power users headroom while still blocking abuse.
API Security: Beyond Basic Rate Limiting
Rate limiting is the foundation of API security. However, it’s not sufficient on its own. A complete API security implementation adds several layers on top — each targeting a different class of attack.
Protecting Against Credential Stuffing
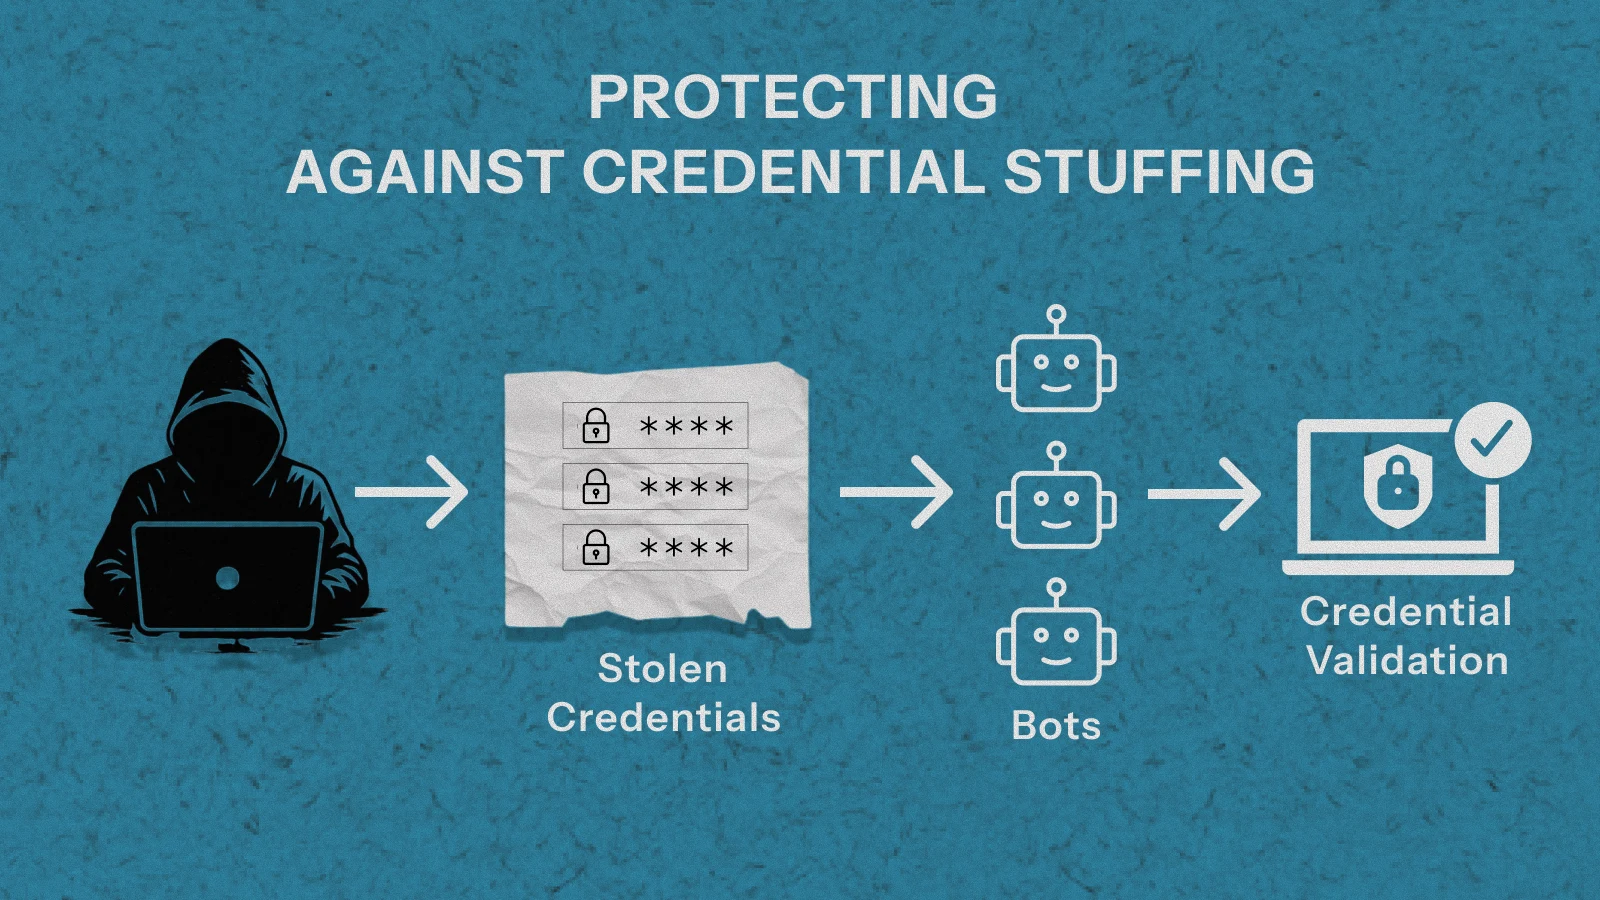
Credential stuffing attacks use large databases of leaked username/password combinations — often millions of pairs — and try them systematically against your login endpoint. Basic IP-based rate limiting alone is not enough, because modern attacks distribute requests across thousands of IPs.
Layer 1 — Limit by IP and Account
Apply separate rate limits for IP address and for account. An attacker rotating IPs can still be caught by per-account limits. Conversely, a legitimate user who shares a corporate IP is protected by per-account allowances.
Layer 2 — Progressive Lockouts
After a set number of failed attempts, implement a progressive lockout. Five failures triggers a 5-minute lockout. Ten triggers a 30-minute lockout. Twenty triggers a full account lockout requiring email verification to unlock.
// Progressive lockout implementation
async function checkLoginAttempts(email, ip) {
  const accountKey = `lockout:account:${email}`;
  const ipKey      = `lockout:ip:${ip}`;

  const [accountFails, ipFails] = await Promise.all([
    redis.get(accountKey).then(v => parseInt(v) || 0),
    redis.get(ipKey).then(v => parseInt(v) || 0),
  ]);

  if (accountFails >= 20) return { locked: true, reason: 'ACCOUNT_LOCKED', retryAfter: null };
  if (accountFails >= 10) return { locked: true, reason: 'TOO_MANY_ATTEMPTS', retryAfter: 1800 };
  if (accountFails >= 5)  return { locked: true, reason: 'TOO_MANY_ATTEMPTS', retryAfter: 300 };
  if (ipFails >= 50)      return { locked: true, reason: 'IP_BLOCKED', retryAfter: 3600 };

  return { locked: false };
}

async function recordFailedLogin(email, ip) {
  await Promise.all([
    redis.incr(`lockout:account:${email}`),
    redis.expire(`lockout:account:${email}`, 86400), // Reset after 24h
    redis.incr(`lockout:ip:${ip}`),
    redis.expire(`lockout:ip:${ip}`, 3600),
  ]);
}

async function clearLoginAttempts(email) {
  await redis.del(`lockout:account:${email}`); // Clear on successful login
}
Protecting Against DDoS Attacks

Distributed Denial of Service attacks send traffic from thousands of different sources simultaneously. Single-point rate limiting — per user or per IP — won’t stop a coordinated DDoS. For that, you need layered defences.
Defence Layer 1 — Edge Rate Limiting
Place rate limiting at the CDN or load balancer level — before requests reach your application servers. Services like Cloudflare, AWS WAF, and Nginx can drop clearly malicious traffic at the network edge. This stops the flood before it consumes your compute resources.
Defence Layer 2 — Aggregate Limits
In addition to per-user limits, implement aggregate limits per ASN (Autonomous System Number) or geographic region. If 10,000 requests suddenly arrive from the same network block, that’s a signal to apply throttling at the ASN level rather than tracking each IP individually.
Defence Layer 3 — Adaptive Limits
During a detected attack, automatically tighten limits globally and alert your team. When traffic returns to normal, relax them. This prevents over-blocking legitimate users during quiet periods while maximising protection under attack.
// Adaptive rate limiting — tightens limits during detected attacks
const NORMAL_LIMIT = 100;
const ATTACK_LIMIT = 20;
const ATTACK_THRESHOLD = 10000; // req/min across all users triggers attack mode

async function isUnderAttack() {
  const totalRequests = await redis.get('metrics:requests:current_minute');
  return parseInt(totalRequests) > ATTACK_THRESHOLD;
}

function adaptiveLimiter(req, res, next) {
  isUnderAttack().then(underAttack => {
    req.rateLimit = { max: underAttack ? ATTACK_LIMIT : NORMAL_LIMIT };
    next();
  });
}
Protecting Against API Scraping
Scraping attacks are harder to detect than brute force — they often mimic legitimate usage patterns, just at higher volume. However, several signals can identify them.
Signals That Indicate Scraping
- Consistent request cadence — exactly 10 req/sec, every second, with no variance
- Sequential resource access — requesting /users/1, /users/2, /users/3 in order
- No browser headers — User-Agent, Accept-Language absent or identical across requests
- High ratio of successful reads with no writes — legitimate users create things
- Requests only to data endpoints — no requests to asset, auth, or UI endpoints
Anti-Scraping Measures
- Rate limit at the resource family level, not just per endpoint
- Add jitter to 429 response timing — don’t make reset windows perfectly predictable
- Fingerprint clients beyond IP: User-Agent, TLS fingerprint, header order
- Require API keys for all read operations — anonymous scraping becomes impossible
- Add honeypot endpoints — real users never call them, scrapers eventually do
Common Rate Limiting Mistakes That Defeat the Purpose
Implementation errors can make rate limiting completely ineffective — even when the code looks correct. These are the mistakes that appear most often in production systems.
Mistake 1 — Using In-Memory Storage
In-memory rate limit counters don’t persist across server restarts and don’t synchronise across horizontally scaled instances. With three app servers, each maintains separate counters — effectively giving clients three times their intended limit. Always use Redis in production.
Mistake 2 — Limiting Only by IP Address
IP-based limiting is easy to bypass. Attackers use VPNs, proxy networks, and botnet infrastructure to rotate IPs constantly. Moreover, many legitimate users share a single IP — corporate NAT, university networks, shared VPNs. Limit by authenticated user ID first, then fall back to IP for unauthenticated traffic.
Mistake 3 — No Limits on Authentication Endpoints
Teams add rate limiting to data endpoints but forget login and registration routes. These are the highest-value targets for attackers. Authentication endpoints need the strictest limits of any endpoint in your system.
Mistake 4 — Silent Failures When Redis Is Down
If your rate limiter depends on Redis and Redis goes down, the wrong default is to either block all requests or crash the server. The right default is to fail open — allow requests through — and alert your team. A brief period without rate limiting is better than taking your API offline.
// Graceful degradation when Redis is unavailable
const apiLimiter = rateLimit({
  // ...config...
  skip: async (req) => {
    try {
      await rateLimitRedis.ping();
      return false; // Redis healthy — apply limits
    } catch {
      console.error('Rate limit Redis unavailable — skipping limits');
      return true;  // Redis down — fail open, alert separately
    }
  }
});
Mistake 5 — Thundering Herd After Window Reset
When a rate limit window resets, all blocked clients retry simultaneously — creating a sudden traffic spike that can trigger the limit again immediately. Add jitter to your retry guidance in the Retry-After header to spread the load out.
// Add jitter to Retry-After to prevent thundering herd
const rateLimitHandler = (req, res) => {
  const baseRetry = Math.ceil(req.rateLimit.resetTime / 1000);
  const jitter = Math.floor(Math.random() * 10); // Add 0-10 seconds of randomness
  res.status(429).json({
    error: {
      code: 'RATE_LIMIT_EXCEEDED',
      retryAfter: baseRetry + jitter, // Stagger client retries
    }
  });
};
Mistake 6 — Not Testing Your Rate Limiting
Rate limiting is easy to misconfigure silently. Test it explicitly before shipping. Send requests beyond the configured limit and assert you receive 429 responses. Verify headers are present and correct. Test from multiple clients simultaneously to confirm Redis is sharing state correctly.
// Simple rate limit test — verify your limits actually work
async function testRateLimit(endpoint, limit) {
  const results = [];
  for (let i = 0; i < limit + 5; i++) {
    const res = await fetch(endpoint, { headers: { 'Authorization': 'Bearer test-token' } });
    results.push(res.status);
  }
  const limited = results.filter(s => s === 429).length;
  console.log(`Sent ${limit + 5} requests. Got ${limited} rate-limited responses.`);
  console.assert(limited >= 5, 'Rate limiting not working correctly!');
}
Rate Limiting & Security Pre-Ship Checklist
Before shipping any API to production, verify every item below. These are the decisions most often skipped under deadline pressure — and most frequently responsible for security incidents.
| ✓ | Checkpoint | Priority |
| ☐ | Rate limiting uses Redis — not in-memory storage | Critical |
| ☐ | Rate limit key uses authenticated user ID (not IP-only) | Critical |
| ☐ | Authentication endpoints have stricter limits than data endpoints | Critical |
| ☐ | RateLimit-* headers returned on every response | High |
| ☐ | Retry-After header included on all 429 responses with jitter | High |
| ☐ | 429 response follows your standard API error envelope | High |
| ☐ | Graceful degradation configured if Redis becomes unavailable | High |
| ☐ | Tiered limits implemented if API serves multiple subscription plans | Medium |
| ☐ | Progressive lockout on authentication endpoint after failed attempts | High |
| ☐ | Health check endpoint excluded from rate limiting | Medium |
| ☐ | Rate limiting verified with automated tests in CI pipeline | High |
| ☐ | Rate limit metrics (429 rate per endpoint) tracked in your dashboard | Medium |
| ☐ | Aggregate / adaptive limits considered if API faces DDoS risk | Medium |
| ☐ | Rate limits documented in your API documentation for consumers | Medium |
Build a More Resilient API
A quick review of your rate limiting and security setup today can prevent serious issues under real-world traffic.

Amandeep singh
Custom Software Developer


Insights that Drive Innovation
Read expert takes on custom software development, digital trends, and real-world
growth strategies — straight from the minds at TechMarcos.